A Beautiful Life With You

I had so much joy putting this one together.

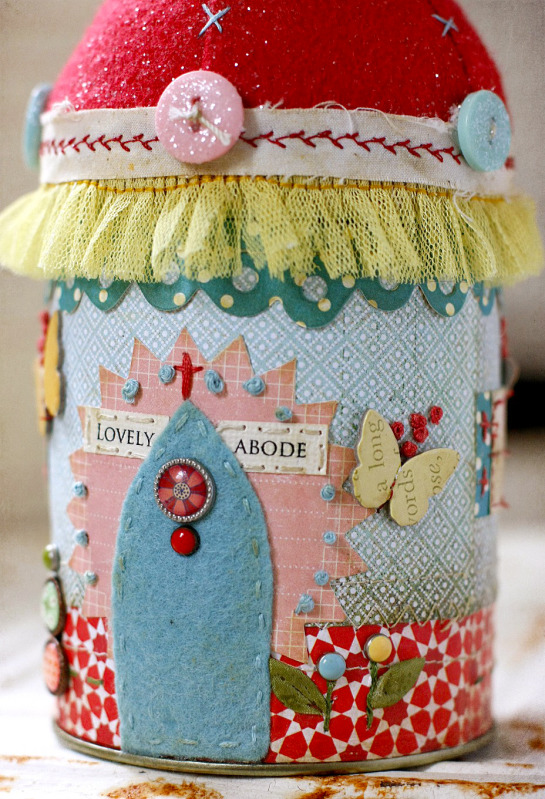
I started with the 'Twiddleybitz Round Fantasy Overlay',  added some of The ScrapCake 'Spring Awakening' papers designed by Karola Witczak and some pretty Manor House Creations blooms. 
I combined these with some inspiration from the Manor House Creations January Sketch and this is what I came up with. 


 The Spring Awakening background paper is so soft and delicate and was perfect for achieving the light and airy feel to the page that I was after. 

The Twiddleybitz chipboard elements were painted white and finished with a touch of Tattered Angels glitter glam.  


Some hand cutting and some layering

A sprinkling of resin

A pretty bow


A variety of gorgeous MHC blooms 

And a couple of Twiddleybitz butterflies frolicking among the blooms finishes it off. 

********************

Materials

Twiddleybitz Round Fantasy Overlay
Twiddleybitz Assorted Butterflies
The ScrapCake Spring Awakening - SA-P01,SA-P03, SA-P04 SA-P06
MHC Flowers - Enchanted, Tiarna -White, Romance - Devoted.
Melissa Francis Resin - Elegance
Resin Flowers
Tattered Angels Glitter Glam - Icicle
Ranger Paint - White

Digital Credit: Ali Edwards Word Art Digital Brush

You have read this article Layout / Manor House Creations / The ScrapCake / Twiddleybitz with the title January 2012. You can bookmark this page URL http://skinnyminny22.blogspot.com/2012/01/a-beautiful-life-with-you.html. Thanks!

Studio Calico and GlueArts Occupy Us Lately...

Lately...

We're working, blogging, crafting, creating, driving carpool, reading, watching, listening, writing, playing, smiling...

what about you???

Lately Layout
GlueArts Designer: Grace Tolman

I was in love with the Studio Calico classic kit that we get to use in this team up. I was especially inspired by all of the pattern papers. They are very sophisticated and so I decided to make a “me” page. It’s not often I do so and the papers went perfectly with my theme. 


Supplies Used:
Glue Arts Perma Tac
Glue Arts Raisen’s
Glue Arts U cut it foam
Cardstock- Bazzill
Pattern paper- Basic Grey; Sassafrass; Studio Calico; Pebbles
Letter stickers- Picadilly, Basic Grey
Butterfly chipboards- Sassafrass
Brads- Basic Grey
Stamp- Hero Arts
Die cut shape- Studio Calico
Pen- Creative Memories
Border punch- Martha Stewart Crafts, Fiskars
Thread- Coats and Clark
Sewing Machine- Kenmore
Ink- American Crafts, Tsukineko
Tape- Studio Calico
Square punch- Marvy Uchida

Instructions:

1. First off, mark 2” squares on the left side of the paper. Machine stitch the lines and then add a border punch to the top edge of the paper. 


2. Punch out squares from the pattern paper. I punched out two from each since they are double sided. Ink the edges with brown ink pad. 

3. Adhere the papers into the square spaces with Perma tac adhesive. 
4. Trim a piece from the lined paper, add a border punch to the left side of the paper and then adhere the letter stickers. Make the title stand out more by adding pen mark around the letter stickers. Ink the edges. 
5. Add some tape on the top and bottom right of the layout. 
6. Pick three chipboard butterflies and add brads to the centers. 

7. Adhere these chipboards in empty square spaces with Glue Arts Raisen’s. 
8. Mat the photo with black cardstock, trim and then adhere to the center of the card with Glue Arts Perma Tac. 
9. Stamp on one of the die cut starburst shape and then adhere that to the top left side of the page with Glue Arts Foam adhesive. 
10. After looking at the page from a far, I found that the light colored letter stickers are not very readable so I made them stand out more by adding pen lines around the letters. 


Well that wraps up our amazing two week journey with Studio Calico and their beautiful kits and products! We hope you've enjoyed the projects we've shared!

Today is the final chance to enter to win your own Studio Calico kit! 

The Studio Calico Field Guide is filled with papers, cardstock, alphabet stickers, brads, stickers, butterflies and a custom stamp exclusive to Studio Calico and the kit!

Simply post a comment and we'll enter you to win the same beautiful kit of supplies that the Glue Girls worked with along with a Glue Glider PRO and a new PRO+ Multidirection Flip Perma Tac Cartridge.(if you already own a PRO handle..we'll offer you a choice of the handle or another cartridge instead)


We hope you'll stop by tomorrow and do visit the Studio Calico blog for more ideas, inspiration...and to find out more about Studio Calico's monthly kits!  


The GlueArts team is headed to sunny Anaheim, California for the Winter 2012 CHA Craft & Hobby Trade Show!! We plan to blog directly from the show to share with you the latest trends products and more! So be sure to check in all next week to see what we're about to! For more information about CHA and GlueArts, please take a moment to visit our GlueArts CHA Winter 2012 page for more details about our events, make n takes and much more!


You have read this article Glue Gilder Pro / Grace / Raisen's / Studio Calico / U Cut It Foam with the title January 2012. You can bookmark this page URL http://skinnyminny22.blogspot.com/2012/01/studio-calico-and-gluearts-occupy-us.html. Thanks!

It's a "Lovely" Day Today with GlueArts & Studio Calico

Some days I write a little prose, talk a bit about this or that...while other days the words don't come quite so easily.

Today is one of those. And it's not because Designer Linda Albrecht's project isn't amazing, beautiful and wonderful.

It's because today's project from Linda IS ALL of those plus a million other superlatives. I find myself anxious for you to see what she has made...and feel the same way we (and I) do!!!
"Lovely Abode" Pincushion Container
GlueArts Designer: Linda Albrecht


Use a metal gift can available in craft stores to make this little house shaped pin cushion. Store extra pins or a small scissors inside the can or you can fill the can with a small gift for a sewing friend.


Supplies:
Glue Arts Hot Glue Gun & sticks
Glue Arts DryStick Mounting Squares & Micro Extreme Adhesive Squares
Studio Calico "Field Guide" Kit
Other:
Wool Felt- Sweet Emma Jean's Etsy Shop
Embroidery floss & buttons
Trinket pins & bead- Maya Road
Crackle paint- Clear Rock Candy by Ranger
Metal gift can


Instructions:
1. Measure and cut patterned papers to fit around can then use Perma Tac Adhesive to layer.
2. Use sewing machine to stitch on layered papers near paper edges and along the scalloped paper trim.

3. Cut cardstock for windows & a strip the same width as the windows then adhere windows to the strip using DryStick mounting squares.
4. Apply embellishments onto the layered papers as desired. Cut a door from felt and hand stitch with embroidery floss. Machine stitch window panes onto window bases. Apply chipboard butterflies with Micro Extreme Adhesives squares and embroider french knots where desired.

5. Apply Clear Rock Candy Crackle paint to the finished windows and allow to dry.
6. Apply brads where desired and flatten prongs well.
7. Cut 5 triangular pieces from red wool felt and machine sew together.

8. Use Perma Tac Adhesive to adhere the completed paper piece to the circumference of the can.

9. Use hot glue to adhere about half of the felt roof to the can cover and allow to dry for a minute then begin to add fiberfill to stuff the roof top. Adhere the rest of the felt roof the the can cover once stuffed.

10. Apply buttons at the bottom of the roof along the seams. 
11. Apply trims along the can lid to cover edge of roof felt with hot glue.


Are you all just stunned and shaking your heads in amazement as we did? Imagine an entire "village" of these amazing homes...pretty spectacular!!

Well GlueArts would like to help you be able to create this masterpiece along with many of the other projects we've shared this week and last. Simply post a comment and we'll enter you to win ...


The Studio Calico Field Guide is filled with papers, cardstock, alphabet stickers, brads, stickers, butterflies and a custom stamp exclusive to Studio Calico and the kit!

Simply post a comment and we'll enter you to win the same beautiful kit of supplies that the Glue Girls worked with along with a Glue Glider PRO and a new PRO+ Multdirection Flip Perma Tac Cartridge.(if you already own a PRO handle..we'll offer you a choice of the handle or another cartridge instead) And as a surprise we're also going to include our Designer favorite GlueArts Hot Glue Gun too!!


We hope you'll stop by tomorrow and do visit the Studio Calico blog for more ideas, inspiration...and to find out more about Studio Calico's monthly kits!  


If you're headed to CHA this weekend we hope you'll be sure to stop by the GlueArts booth! We have make n takes and more planned! We're in booth #2333!! Be sure to take a moment to visit our GlueArts CHA Winter 2012 page for more details about our events, make n takes and much more!

You have read this article Linda / Studio Calico with the title January 2012. You can bookmark this page URL http://skinnyminny22.blogspot.com/2012/01/it-day-today-with-gluearts-studio-calico.html. Thanks!

Prima CHA Meadow Lark - 'Run to Paradise'

Hello again lovely people,

I have another Prima sample to share, this time a project created from the gorgeous Meadow Lark Collection. 

My heart skipped a beat when I first saw this collection.  There is so much not to love about it.  Totally **heart** the colours, the birds and the floral elements.

For my following layout, I have concentrated on the blue and yellow of the collection.  

I first started by altering the base of patterned paper with a light covering of Gesso and Gloss Multi Medium.   A touch of glimmer mist was then added. 


Floral 'Astor' blooms were hand cut from the Meadow Lark 'Astor' patterned paper and coloured with water crayons.   I chose a happy yellow colour for these.
'Happy yellow Astor's' were layered with an assortment of pretty blooms including the Merelle and Sassy felt beauties.  
You will also a spy a sprinkling of 'Flutter Bits' and a touch of sparkle with a Pearls and Crystal flourish.


 Materials

#843830 Meadow Lark Col. Labelle
#843786 Meadow Lark Col. Chloe
#843823 Meadow Lark Col. Bronte
#843816 Meadow Lark Col. Wind Song
#843793 Meadow Lark Col. Astor
#843847 Meadow Lark col. Grace
#555252  Chipboard Pieces – Meadow Lark
#554774 – Meadow Lark
#554293 Alphabet Cardstock Typeset – Meadow Lark
#556136 Essential Petals – Meadow Lark
#556705 Perle Bebe – Meadow Lark
#556099 Melisse – Meadow Lark
#556143 Lucerne – Meadow Lark
#556105 Vinetta – Meadow Lark
#556150 Flutter Bits – Meadow Lark
#554699 Resist Canvas - Natural
#554194 Pearls & Crystals & Packaging
#558642 Merelle – Apricot
#558543 Sassy – Aqua

Ranger Gesso
Ranger Gloss Multi Medium
Tattered Angels Glimmer Mist – Sapphire, Patina


You have read this article Layout / Prima with the title January 2012. You can bookmark this page URL http://skinnyminny22.blogspot.com/2012/01/prima-cha-meadow-lark-to-paradise.html. Thanks!

A Day of Firsts With Studio Calico and GlueArts PRO+

Studio Calico

A kit club and amazing product line.

The monthly kit club is filled with an amazing, eye-pleasing assortment of papers, cardstock, embellishments, chipboard, stamps and more. In fact often it's the kit is packaged and put together so amazing...well some of us have  a hard time breaking it up!lol)

They also offer extra add-on kits that enhance the main kit, offer another fun theme and make you wish you could purchase one of each!! It's slightly addictive and altogether wonderful! Here's an example of one of their kits and add-ons.


Our Designers all commented time and time again how much they enjoyed  working with the kit...proof is in the pudding...here's a beautiful layout from Designer Lesley Langdon!

First Golf
GlueArts Designer: Lesley Langdon


Supplies:
Glue Arts Glue Glider Pro (Perma Tac Adhesive)
Glue Arts Extreme Adhesive Squares
Glue Arts Ribbon Adhesive
Studio Calico Kit (Field Guide)
Spellbinders Die Templates (Grand Labels Four, Grand Labels One, Grand Big Scalloped Ovals)
Clearsnap Ink (ColorBox Queue)
Antique Linen Distress Ink by Ranger
Cut n Dry Foam by Ranger


Instructions:
1. Die cut grand labels from different papers. On one, apply tape and trim with Glue Arts Ribbon Adhesive.

2. Ink all edges with pigment ink.

3. Adhere papers to cardstock background with your Glue Glider Pro (Perma Tac Adhesive). Ink around the die cut papers with Antique Linen Distress ink, using a foam applicator.


4. Make rosette flower and stack layers using Glue Arts Extreme Adhesive Squares.

5. Adhere decorative tape, one layer, ruffle it when applying, the other tape, lay flat on top. 
6. Adhere rosette flower and chipboard butterflies to the layout with Glue Arts Extreme Adhesive Squares.


7. Adhere brads and sticker letters for the title.
8. Add journaling and ink around the cardstock background edges.


Beautiful!!! So tell us...are you a 12 by 12 scrapper. Do you tend to scrapbook more holidays and special events...or also every day moments? Do you make cards? Altered projects? Jewelry?

We'd love to hear from you and a bit about your holidays! And for posting a comment...


we'll enter you to win the same amazing kit from Studio Calico that our team of designers worked with! 

The Studio Calico Field Guide is filled with papers, cardstock, alphabet stickers, brads, stickers, butterflies and a custom stamp exclusive to Studio Calico and the kit!

Simply post a comment and we'll enter you to win the same beautiful kit of supplies that the Glue Girls worked with along with a Glue Glider PRO and a new PRO+ Multdirection Flip Perma Tac Cartridge.(if you already own a PRO handle..we'll offer you a choice of the handle or another cartridge instead)


We hope you'll stop by tomorrow and do visit the Studio Calico blog for more ideas, inspiration...and to find out more about Studio Calico's monthly kits!  


And for all of our CHA Friends coming to see us at the Winter Craft & Hobby Trade Show...we'll see you soon!! Be sure to take a moment to visit our GlueArts CHA Winter 2012 page for more details about our events, make n takes and much more!
You have read this article Lesley / Studio Calico with the title January 2012. You can bookmark this page URL http://skinnyminny22.blogspot.com/2012/01/a-day-of-firsts-with-studio-calico-and.html. Thanks!

Prima: CHA Almanac Collection - 'Summer Daze'

Hello Lovely People,

Recently I shared a peak of the new Prima Almanac Collection.

Here is my sample layout using this gorgeous collection.

I just adore the softer salmon pink tonings combined with the classic colours of this collection.


'Summer Daze' 

Materials

#844134 Almanac Collection – Edison
#844141 Almanac Collection – Notary
#844158 Almanac Collection – Agenda
#844165 Almanac Collection - Wordsmith
#844097 Almanac Collection - Composition
#844110 Almanac Collection – Libre
#844103 Almanac Collection – Toile
#555313 Chipboard Pieces – Almanac
#556235 Charme Rose - Almanac
#556259 Lucerne -  Almanac
#556204 Camille – Almanac
#556242 Essentials Petals – Almanac
#553951  Pearls – Songbird
#554330 – Alphabet Cardstock Typeset – Fairy Belle

Photo Credit: AnneaJames Photography


And a closer peak...


Lots of layering with patterned papers, die cut and hand cut elements 


Along with coordinating Almanac chipboard and blooms including Charme Roses, Camille and Essential Petals.

Now a little heads up for all you lovely people who love PRIMA.
 There are giveaways all this week and next. 
To kick off, here is a peek at what Prima's giveaway is today  

Giveaway copy

Make sure you head on over to the Prima BLOG and leave a comment telling Prima what your favourite product is thus far!

Good Luck 
xx T

You have read this article Layout / Prima with the title January 2012. You can bookmark this page URL http://skinnyminny22.blogspot.com/2012/01/prima-cha-almanac-collection-daze.html. Thanks!