Scrapping Outback Reveal: Where the wild things are

Kicking off February with a bit of twisting.

Scrapping Outback's White with a Twist challenge has been revealed and this month we are going a bit fruity with the colours Rapsberry, Mango and Kiwi Lime.

Here is where my twisting took me....

Where the wild things are

Photobucket

Now there is a little story that goes with how the title of this layout came about. I realise that there is a book that is titled 'Where the wild things are'... but at the time my girls were unaware of such of book. We were up the mountain collecting fire wood and this particular day, my girls decided to go 'exploring'.... on the way I heard Miss E say to Miss N 'let's go find where the wild things are' and Miss N replies... 'only if they are nice'.

And a closer look - can you find where the cute, friendly 'wild things'are hiding?

Photobucket

The Cosmo Cricket Garden Variety Patterned Papers were perfect twisting match. Love this Chipboard Flourish Tree available in the Scrapping Outback Store. I gave it a bit of a makeover, first of with Rachelle Minett's Faux Metal Technique and then dressed it up with some foliage which I punched out from the Cosmo patterened paper with a Martha Stewart leaf punch.


Photobucket

Make sure you check out the challenge details and the DT's fabulous twisting creations HERE


Have fun twisting and happy scrapping!
You have read this article Scrapping Outback White with a Twist with the title January 2011. You can bookmark this page URL https://skinnyminny22.blogspot.com/2011/01/scrapping-outback-reveal-where-wild.html. Thanks!

Starting off our Shabby Chic Week


Good Morning Glue Arts fans! This week we are kicking off a fantastic week with our sponsor- Shabby Chic Crafts.

We have some beautiful projects for the upcoming Valentine holiday.

We'll be giving away a Shabby Chic Crafts assorted pack of Valentine diecuts and a Glue Glider Pro and our 3D Combo Pac!!Simply leave us a comment sometime this week and we will randomly choose a winner next week for this fabulous prize pack!

Lindsay has an adorable Valentine box for you. I am thinking of making one for my elementary school child to hold her assorted Valentine's. And Cheri is sharing a sweet card for that special someone.

Valentine Box
Designer- Lindsay Wahl


Supplies:
Glue Arts Adhesives: 3-d combo pack, Extreme squares, Glue Glider Pro Perma Tac, Ribbon Adhesive
Shabby Chic Die cuts

Other materials:
Cardstock: Bazzill
Die Cut: Sizzix (fancy favor)
Pearls: Kaisercraft
Punch: Fiskars
Ribbon: May Arts


Instructions:
1. Die cut red and black favor boxes. You only need a strip that is 2"x 12" for the black favor. Use the Pro to adhere the cardstock together. Fold along score lines. Use Pro to assemble the favor box.
2. Use border punch on strip of black cardstock that is 2"x 12". Use pro to adhere black strip to favor. Hide the seam on the front of the favor where the heart will go.
3. Use ribbon adhesive to adhere heart ribbon to the center of the black border strip. Again, hide the seam on the front of the box.
4. Add pearls along scalloped die cut. Adhere die cut with Raise'n's. Adhere "I love you" die cut with UcutIt foam.
5. Use Extreme squares on the inside of either side of the favor box to create ribbon handle. Use another piece of ribbon to tie the bow at the top of the handle.
6. Write journaling or love note on postcard die cut and place in the box. 


Cork Board Date Night Card
by Cheri Wenger
 
Supplies:

Glue Arts - Glue Glider™ Pro with high tac and extreme adhesive cartridges and U-Cut_it Double-sided Adhesive Foam
Shabby Chic Crafts - Valentine themed Cardstock Cut Outs
DCWV - black square card & envelope
Little Yellow Bicycle - Heart Stick Pin
The Twinery - Maraschino and Caribbean Twine
May Arts - satin diecut hearts ribbon
Recollections - small black brad
Stampin’ Up!® - Tempting Turquoise Cardstock
Misc. - 1/8" hole punch; piece of thin rolled cork; black marker; sicssors; scrap paper

 
Instructions:

1. Cut strip of Turquoise CS to 5.5" x 1" and attach to card 1-3/4" from the top edge using Pro with high tac adhesive.
2. Cut cork rectangle to measure 4.5" x 3.25". Play with positioning of paper CS elements on top of cork. Punch hole with 1/8" punch and insert black brad into main ledger card. Fasten in back. Add paper clip. Attach these layered elements to the piece of cork using Pro with high tac adhesive cartridge.
3. Switch out high tac cartridge to the extreme adhesive cartridge and apply it to back side of cork. Add cork at an angle to front of card.
4. Add piece of U-Cut_it foam to XO heart circle and layer in bottom right.
5. Add heart stick pin to cork board being careful to not insert through the cardstock, just the cork.
6. Cut 21-22" pieces of red and turquoise twine. Tie both around bottom of front panel and tie in a bow. Trim ends to desire length.
7. Trip string of diecut ribbon hearts to width of card. Place face down on scrap paper and run Pro over top with high tac adhesive cartridge inserted. Remove any excess adhesive from open areas. Attach to bottom of card.
8. Add your own personal message to the message board to complete this card


 Lastly our winner of last week's prize pack-
2 sheets each of our Accent It All Vinyl in Dazzle Red, Tickle Me Pink, Sterling Silver, White Out, Wild Blue Yonder and Plum Crazy!! And to assist your crafting...we'll include our Adhesive Squares which are a must have for every crafter! is...


wearestampers said...
Love the cut out look of these cards! This is a must try! Thanks for sharing! Pam congrats Pam! please email  Gluegirl@gluearts.com with your information and we'll get that right out to you!!
 
 
You have read this article 3D Combo Pac / Adhesive Squares / Cheri / Extreme Adhesive / Glue Gilder / Glue Gilder Pro / Kristen / Lindsay / Perma Tac / Ribbon Adhesive / U Cut It Foam with the title January 2011. You can bookmark this page URL https://skinnyminny22.blogspot.com/2011/01/starting-off-our-shabby-chic-week.html. Thanks!

Accent It All Around The House!

Accent It All around the house with our vinyl accents!

We've showed you windows, walls, cars, mirrors..today...picture frames and yes...sweet Valentine plates!

Wait till you see what we have for you today!


Cheri Wenger shows how you can transform this picture frame from this...

Into this...
user posted image
Oh So Tweet Frame
Designer: Cheri Wenger

This project makes a perfect Valentine’s gift, but can also be used as home decor or for a wedding gift or reception.

Supplies:
Glue Arts: Accent-it-All Black Vinyl; Glue Glider™ Pro with Repositionable Adhesive; Mini Extreme Adhesive Squares
Michaels: $4 Studio Decor Simply Classic Black Frame; Recollections Adhesive Pearls; Offray Black & Silver 3/8" Satin Ribbon
Stampin’ Up!®: Crystal Effects; 5/8" Black Grosgrain Ribbon; Little Leaves Sizzlits die
JoAnn's: Studio 112 $1 Black and Silver Die-Cut Stickers; Iridescent Glitter
Darice: Black Sequins
Marvy: Flower punch
Xacto: Cutting Knife
Basic Grey: Bittersweet Blushing Pink CS (frame insert)
Core’dinations: Stilleto Core Couture Glittered CS
Photograph*
Paint brush
Lovey Dovey Collection - digital brushes & bonus svg files by Cheri Wenger
http://www.mygrafico.com/illustrations-cli.../prod_3985.html
QuicKutz® Silhouette™ Digital Craft Cutter w/ Adobe Illustrator on Mac Computer
Scrap Paper (for recycling glitter)

* Temporary adhesive was used to temporarily position photo onto CS so that it can be changed out seasonally or yearly, if desired.

Instructions:

1. Mount photo onto 7" x 5" piece of Bittersweet CS with Glue Arts Temporary Adhesive. Insert inside of frame.
 2. Scale and cut svg graphics from Lovey Dovey collection** bonus svg art for use on frame. I set up a separate file with the graphics I was using on my Mac using Adobe Illustrator. Then I cut them out of Glue Arts’ Accent-It-All black vinyl with RoboCraft Software on my Silhouette Digital Diecutter. These svg files can be used with Cricuit diecutter and SCAL software.

**Note: You can purchase the Lovey Dovey collection in my digi shop on www.mygrafico.com and you recieve the 5 bonus svg files for free with the set. Direct link to product - http://www.mygrafico.com/digi-tools/photos.../prod_3984.html or you can use similar svg files to create your own custom frame!

3. These black vinyl graphics were then added on top of glass. I used an Xacto knife to help remove them from sheet and add them to the glass. Silhouette makes transfer paper that works with their vinyl to transfer detailed designs in perfect alignment. I haven't gotten to test this out, but I think it would be very helpful with these detailed graphics. I just used my eye to position so alignment isn't 100% exact.


user posted image

4. Apply small black vinyl heart on top of CS and trim around shape to create paper heart which will be used on top of bow later on.
 5. Punch 2 flowers using large Marvy punch from Core’dinations pink glittered CS.
Crumple CS, bend to soften, then separate CS into 2 pieces as shown in the photo below. Repeat again on 2nd punched flower to create 4 flower pieces
.

user posted image

6. Further manipulate separated paper flowers, crumple, fold and pinch together. Keep inner fuzzy side of punched floral facing up. Add mini extreme adhesive squares to hold pinched flower together. Create four of these, which will be joined together to make full flower. Fluff and bend to form into your flower.

user posted image

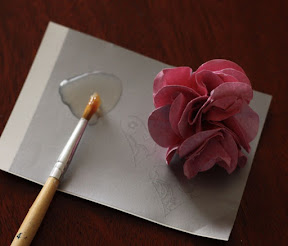
7. To add some stiffness to flower and to sugar coat it, I applied Crystal Effects clear lacquer with a paint brush to the petals then sprinkled iridescent glitter on top.
Use a catch sheet of scrap paper below the rose for sprinkling glitter lightly on top and recycling excess back into container.


user posted image

8. Make a criss cross bow using black and silver ribbon and mini adhesive squares to connect each loop in the center. The paper liner on the mini extreme adhesive squares makes it easy to apply the squares onto the ribbon and keep your hands free of adhesive!

user posted image

9. Trailing ribbons were added to the bow using mini extreme adhesive squares to attach ribbon to frame and create gentle draping effect.
 10. Use mini extreme adhesive squares on back side of pink paper heart created earlier and add on top of bow.


user posted image

11. Apply black & silver stickers to add verse on top of glass. Add mini extreme adhesive squares to back of sequins and add to frame surrounding vinyl graphics. Embellish these with small adhesive pearls.
 12. Cut piece of grosgrain ribbon and trim ends to diagonal point. Make loop and secure with mini extreme adhesive squares and attach to lower right corner of frame.
 13. Diecut little leaves from pink glittered CS. Attach to bottom of frame using Crystal effects. Place several mini extreme adhesive squares on top of grosgrain ribbon to add flower. Before adding squeeze a small puddle of laquer in corner to help hold flower in place. Attach flower.

Close Up detail of sugared paper flower:

user posted image

14. Add large and small adhesive pearls to outside of frame to decorate and finish.

Close up detail of frame graphics:

user posted image


And how about decorating your dining room....set a sweet and special place setting for your family!! Designer Julia Sandvoss shows you a fun way to celebrate Valentine's Day...well every day!


Valentine Dinner Wear
Designer: Julia Sandvoss


Designer Tip: I picked up these fun plates at Target on clearance knowing my family would get a kick out of using them for sandwiches, snacks and those plates of cookies that always seem to be around.   
Supplies:
Glue Arts Accent It All vinyl...Dazzle Me Red, White Out, Goin Green and Tickle Me Pink
Sizzix Big Shot Die Cut System - Heart Layers, Flower Layers Dies
Cricut Expression - All Mixed Up and Doodlecharms Cartridges
Plates


So are you ready to add some Accent It All around your home? Well we can help out...simply leave us a comment and we'll pick a random winner next Monday who will win 2 sheets each of our Accent It All Vinyl in Dazzle Red, Tickle Me Pink, Sterling Silver, White Out, Wild Blue Yonder and Plum Crazy!! And to assist your crafting...we'll include our Adhesive Squares which are a must have for every crafter! Simply leave us a comment ....we know you want to win! 


On a side note...we're all headed off today to CHA! We'll be updating our Twitter and Facebook pages with pictures and posts about what we're up to. So if you're not a Glue Arts fan on Facebook or Twitter...now is the time!
You have read this article Accent It All / Cheri / Extreme Adhesives Mini Sqaures / Glue Gilder Pro / Julia with the title January 2011. You can bookmark this page URL https://skinnyminny22.blogspot.com/2011/01/accent-it-all-around-house.html. Thanks!

Accent It All With Love Tags!!!

Me Amore!!

I Love You!

These sweet phrases can be heard in abundance over the next few weeks!

Designer Lesley Langdon shows how you can use our Accent It All Vinyl to accent your Love Tags! What a sweet way to share with someone how much you love them!


Big Love Tags
Designer: Lesley Langdon

Supplies:
Glue Arts Accent It All (Red and Pink)
Glue Arts Extreme Adhesive Squares
Glue Arts Ribbon Adhesive
Glue Arts Mini Adhesive Squares
Glue Arts Perma Tac Adhesive (Glue Glider MAX)
Patterned Paper: Little Yellow Bicycle (Cupcake Collection)
Cardstock: American Crafts (White)
Pins, Chipboard Stickers, Epoxy Hearts, Heart Doilies: Little Yellow Bicycle (Cupcake Collection)
Ink: Staz-on Pink
Ribbon: May Arts
Rose Ribbon: American Crafts
Spray: Shimmerz Spritz (Jeni B Bleu, Cotton Candy)
Twine: The Twinery
Tools: Spellbinders Circle Die, Cuttlebug, Scalloped Punch by EK Success, Sewing Machine, Silhouette Machine
Other: Acetate


KISSES TAG:1. Cut tag from cardstock.
2. Spritz doily with Shimmerz, let dry, adhere to tag with Extreme Adhesive Squares, run through die cut machine and cut circle through the doily and tag.
3. Adhere scalloped patterned paper on the bottom with Perma Tac adhesive.
4. Cut shapes using the Silhouette (scalloped heart, heart with words), adhere to acetate, using the scalloped heart first, then laying the red heart over top.
5. Adhere acetate to tag at the back with Extreme Adhesive Squares.
6. Adhere rose ribbon with Ribbon Adhesive.
7. Tie ribbon bow for top and add pom pom ribbon and chipboard sticker.
8. Adhere epoxy heart and twine.
9. Finish back side of tag by covering with paper, that has a die cut circle, so that the acetate is still see through.


And we have one more Girl's Paperie project to share with you today from Designer Carole Janson! We goofed and missed posting this for you all last week! So please take a moment to see how Carole made this sweet and easy to recreate layout!!

This is My Favorite Layout
Designer: Carole Janson

Supplies:

Papers and cardstock stickers: Girls Paperie's On Holiday line
Glue Arts Adhesive: Glue Glider Pro
PermaTac refill
Extreme Adhesive Squares 
Glue Gun, Glue Sticks
Twinery: Yellow


Step 1: Cut out different size circles using different types of pattern paper, making sure you have large and small sizes, you can use punches if you like. Stick to the background pattern paper using Glue Arts Perma Tac.
Step 2: Create a matt for 2 photos, 18 x 12 cms and stick over the circles using Glue Arts Perma Tac, then add photos, you can layer one photo over the other using Glue Arts 3D combo pack foam tape and Glue Arts Extreme Adhesive Squares.
Step 3: Create embellishments with the stickers and make a cute banner for added detail and stick down using Glue Arts Glue Gun and Glue Sticks.


Alright Glue Arts Fans....you know the drill....leave us a comment today and we'll enter you to win a selection of our Accent It All vinyl! We'll send the winner  2 sheets each of our Accent It All Vinyl in Dazzle Red, Tickle Me Pink, Sterling Silver, White Out, Wild Blue Yonder and Plum Crazy!! And to assist your crafting...we'll include our Adhesive Squares which are a must have for every crafter! Simply leave us a comment! And we'll announce a random winner on Monday!!


And just a note...half of our Glue Arts crew is on their way to Los Angeles to CHA. The other half leaves bright and early tomorrow morning! I'm putting the final touches on this


....because the Glue Girl will be in the house! Be sure to stop by our booth #2952 and say hello, join us in a make and take and come meet our fantastic Glue Arts team!!!
You have read this article Accent It All / Carole / Extreme Adhesive / Glue Arts Glue Gun / Glue Gilder Pro / Lesley / Mini Adhesive Squares / Perma Squares / Ribbon Adhesive with the title January 2011. You can bookmark this page URL https://skinnyminny22.blogspot.com/2011/01/accent-it-all-with-love-tags.html. Thanks!

Say with Flowers!!

It's True!

You can say it with flowers when you use our Accent It All vinyl! No longer are you limited to walls and home decor....but now you can express your creativity with....Flowers!

user posted image
Be Mine
Designer: Leslie Ashe

user posted image


Supplies:

-Glue Arts 3D UCut It foam adhesive

-Glue Arts Glue Glider Pro with Extreme Tac cartridge

-Glue Arts Accent It All Vinyl in red and silver

-black ink
-stamps (American Crafts love line)
-patterned paper (American Crafts love line)
-letter stickers (American Crafts - Thickers)
-chipboard album page (I used a page from a Bo Bunny album)
-heart punch
-black pen
-ruler


Directions:


-using a chipboard album page, cover in pattern paper:


-punch hearts from the Glue Arts red Accent It All vinyl:
user posted image


-arrange them in a flower shape and adhere using Glue Arts 3D UCut It foam (stack 3 rows, making a full flower and slightly bend edge of hearts up, giving them dimension):


-stamp sentiment on Glue Arts silver Accent It All vinyl using black permanent ink (such as Staz on. It dries FAST!):
user posted image


-adhere sentiment to center of flower:
user posted image


-with a ruler and a black pen, draw a line along the edge:
user posted image


and here's a look at what it looks like lying flat (you can see the dimension):
user posted image


it's really easy, it was a fast and fun project and I can't wait to decorate with it!


Tell us....have you ever thought of using our Accent it All Vinyl to  make flowers??? Both Linda and  Leslie show easy ways that you can use our vinyl to say it with flowers!!!


Be sure to leave us a comment today and all week long! We'll announce a random winner next Monday who will win 2 sheets each of our Accent It All Vinyl in Dazzle Red, Tickle Me Pink, Sterling Silver, White Out, Wild Blue Yonder and Plum Crazy!! And to assist your crafting...we'll include our Adhesive Squares which are a must have for every crafter! Simply leave us a comment!
You have read this article Accent It All / Extreme Adhesive / Glue Gilder Pro / Leslie / U Cut It Foam with the title January 2011. You can bookmark this page URL https://skinnyminny22.blogspot.com/2011/01/say-with-flowers.html. Thanks!

Accent It All With Cards


So you've seen our Accent It All Vinyl...it perfect for your walls, home, mirrors and glass. This week we're showing you new ways, outside the box ways to use our Accent It All vinyl.

Today Designer Kristen Swain shares two beautiful cards that will have your sweetheart swooning!!

user posted image

Love You Cards
Designer: Kristen Swain

Supplies:


Glue Arts Accent it All- Tickle Me Pink, Wild Blue Yonder, and Razzle Dazzle Red
Glue Arts Glue Glider Pro- Perma Tac adhesive, and Glue Arts Adhesive Squares, Ribbon Adhesive, Mini Adhesive Squares
red dot paper- The Girl's Paperie
Blue and Heart paper- Around the Block
seam binding- www.etsy.com/shop/scrapinkris
gem/buttons/twine/pins- craft supply
ribbon- May Arts
deco scissors- provo mini scallop, zig zag fiskars
Cricut expression and Gypsy- Martha Stewart All Occasion Cake Art, and 
Gypsy Wanderings
Acetate- Making Memories
photo corners
scallop punch- Martha Stewart


 I Love You Card
Instructions:


1. Cut card base into 5x5 square.
2. Trim patterned paper, and mount onto blue paper and trim with zigzag scissors, mount onto card using Perma tac adhesive.
3. Use Expression and Gypsy to create cut files for heart, cut out and adhere layers together.
4. Cut out window from card front, adhere acetate with Perma tac adhesive, and add to back of card. Turn card around and adhere Vinyl cutout to front of window. 
5. Finish card by adding ribbon, button and twine with Adhesive Squares , and glitter glue to vinyl. Add polka dot paper to inside of card, and adhere trimmed mini scallop pieces around window using Ribbon Adhesive.


 Love You Card
Instructions:


1. Cut card base to 5x7 inches.
2. Trim window from front of card, then adhere acetate to back of card front using Perma Tac adhesive. 
3. Cut out vinyl using Cricut Expression/Gypsy and Martha Stewart Cake art cartridge. Adhere layers together then adhere to acetate window.
4. Adhere patterned paper strip to top of card.
5. Punch scallop border with punch, adhere to top and bottom of acetate window using Perma tac adhesive. Pen detail stitching along top border.
6. Tie ribbon around bottom of card, then adhere gem to center of bow with mini adhesive square.
7. Tie twine onto buttons, adhere to card using Adhesive Squares, adding two pins before adhering.


Please don't forget to leave us a comment!! We're giving away 2 sheets each of our Accent It All Vinyl in Dazzle Red, Tickle Me Pink, Sterling Silver, White Out, Wild Blue Yonder and Plum Crazy!! And to assist your crafting...we'll include our Adhesive Squares which are a must have for every crafter! Simply leave us a comment and we'll pick a random winner next Monday!
You have read this article Accent It All / Adhesive Squares / Glue Gilder Pro / Kristen / Mini Adhesive Squares / Perma Tac / Ribbon Adhesive with the title January 2011. You can bookmark this page URL https://skinnyminny22.blogspot.com/2011/01/accent-it-all-with-cards.html. Thanks!