Showing posts with label Imaginisce. Show all posts

Showing Thanks is a Snap with GlueArts!!

Recently I was out of town traveling for work.

My family...correction...my daughter helped fill in while I was gone with homework, laundry, lunches and more!

She takes on a big role to help and does an amazing job at only 14!

I wanted to show her how much we appreciate her and knew when I saw the Imaginisce Happy Harvest collection I had a home run! See...she loves owls! No really...she LOVES them!

So I decided to create a card and necklace for her to show her just how thankful we are for her and her help!! GlueArts Adhesives made this project come together in a snap...truly!

And Designer Grace Tolman has a few more ideas to share with you today as well using Imaginisce's Happy Harvest collection! (can you tell how much our team enjoyed working with the products?!)

Thank You Necklace & Card Gift Set
GlueArts Designer: Julia Sandvoss

Supplies:
GlueArts Glue Glider PRO & PRO+ PermaTac Adhesive
GlueArts U Cut It Foam
GlueArts Extreme Mini Squares

Imaginisce Happy Harvest Collection
Epiphany Crafts Studio Shape Tool Round 14 & Bubble Caps
Fiskars Border Punch
EK Success Border Punch & Corner Rounder
Colorbox Chalk Inks
Ribbon


Copper Links
Owl Charm
Blue Moon Beds
Copper Necklace


Sweet Donut Memories Layout
GlueArts Designer: Grace Tolman

Supplies:
Glue arts Perma Tac
Glue Arts U Cut It Foam
Glue Arts Raisen's

Cardstock- The Paper Studio and We R Memory Keepers
Pattern papers, chipboard and die cuts- Happy Harvest, Imaginesce
Circle punch- EK Success
Border punches- Fiskars
Corner rounder- Marvy Uchida
Typewriter- Royal
Letters- Pink Paislee and We R Memory Keepers
Pen- Slick Writer, American Crafts
Thread- Coats and Clark
Sewing machine- Kenmore


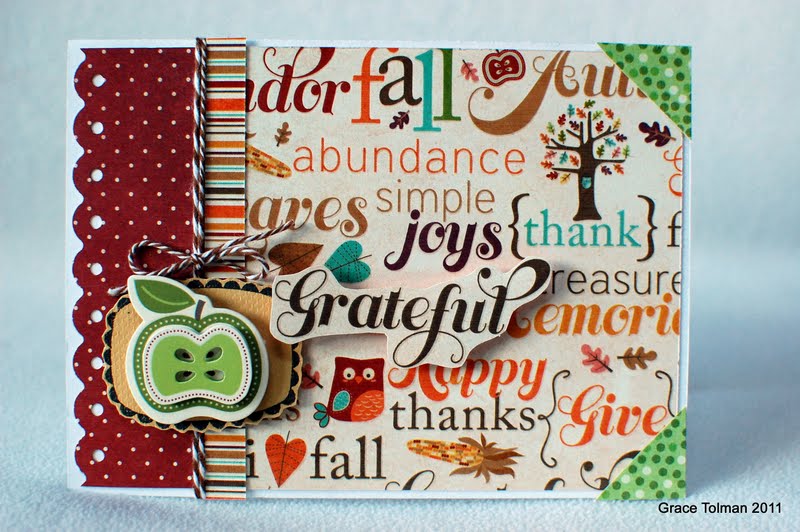
Fall Card Set
GlueArts Designer: Grace Tolman
Supplies:
Glue arts Perma Tac
Glue Arts U Cut It Foam
Glue Arts Raisen's
Glue Arts Mini Adhesive Squares

Pattern papers, die cuts shapes, stickers, stamp, rhinestones- Imaginisce
Cardstock- The Paper Studio, Colorbok
Black pen- Millenium, Zig
Border punch- Fiskars
Baker's twine- Doodlebug Design
Ribbon- Source Unknown


We're starting early for Black Friday!! It's time to reveal our amazing deals we have in store for you!!

Be sure to check out the savings at www.gluearts.com and do some shopping while the deals are hot!! (and from the comfort of your home and maybe pajamas too!)


You have read this article Glue Arts / Glue Gilder Pro / Imaginisce / Perma Tac / Pro+ / Raisen's / U Cut It Foam with the title Imaginisce. You can bookmark this page URL https://skinnyminny22.blogspot.com/2011/11/showing-thanks-is-snap-with-gluearts.html. Thanks!

Thankful for GlueArts and Imaginisce

We're back with more Imaginisce!

What can we say..the designers loved working with the Imaginisce Happy Harvest and GlueArts Adhesives makes creating a snap!

Designer Kristen Swain has made this beauty which..there is still time to make if you're hosting the family for Thanksgiving!

Details with buttons and the Imaginisce I-Top tool help finish this off perfectly!


Thankful Banner
GlueArts Designer: Kristen Swain


Supplies:


GlueArts Hot Glue Gun
Glue Arts Glue Glider Pro & Perma Tac Adhesive


Imaginisce I-Top Tool
Imaginisce Happy Harvest Collection
Maya Road Chipboard Apples
Tattered Angels Spray Mist
Maya Road Spray Mist
Linen Fabric
Buttons and Twine


Stop by tomorrow for our final Imaginisce Happy Harvest project! You'll see it's a great way to show your thanks through jewelry making and a special thank you card!


And are you planning to do some Black Friday shopping? Be sure to steer your cart here for some amazing deals that you won't be able to pass up! And best of all...shop right from the comfort of 
your home! You can't beat that!!


Congrats go out to...Susan Huston from London, Ontario!!! Please email your address to info@gluearts.com with "Share the Savings Winner" in the subject line!


Susan you are our Share the Savings Winner!!!
You have read this article Glue Gilder Pro / Hot Glue Gun / Imaginisce / Kristen / Perma Tac with the title Imaginisce. You can bookmark this page URL https://skinnyminny22.blogspot.com/2011/11/thankful-for-gluearts-and-imaginisce.html. Thanks!

Happy Autumn from GlueArts!!


Happy Autumn Wreath
GlueArts Designer: Grace Tolman


Supplies Used:

Glue Arts Extreme Squares
Glue Arts Glue Gun
Wreath- Plastifoam
Pattern papers and die cut- Happy Harvest, Imaginisce
Circle punches- 1” and 1 ¾”, EK Success
Yarn- Hobby Lobby
Buttons – JAB buttons
Baker’s twine- Doodlebug Design Inc.

I was in love with the papers immediately and wanted to show all of them and what better way than to make a fall wreath with the papers as rosettes. Read on to find out how easy it is to make duplicate this project. 

Instructions:
1. Wrap your wreath with yarn. I am loving yarn right now, it’s cheaper to use on wreaths than ribbon. To secure the ends, tie a couple of knots and trim the excess. 

2. I used two sizes of rosettes here. I trimmed four 12” strips of the same paper into 2” pieces while the smaller rosettes were made with 12 x 1” strips. I then scored them. For the smaller pieces, I made my marks every ¼” and for the big ones it was ½” marks.

3. Then I made then into the rosettes. I folded them on creases and adhered then into a round. For the big ones, I added two strips together. I then punched out two circles from paper and used that to adhere the centers together. Using a glue gun made the project easy to adhere and secured the rosette together very well. 

4. Do step #3 for all of your strips to make the flowers. I made two big ones and 12 small ones. 

5. Next, I added my rosettes to the wreath using more glue gun adhesive. I started with the big ones. 

6. Then I added the smaller ones overlapping then onto each other. 

7. I noticed that I had a few more spaces that were open so I made two more rosettes and then added my die cut sentiment using Extreme squares and glue gun. 

8. To finish off the project, I added some buttons to the flowers. 


We would like to send a BIG thank you to Imaginisce, their team of Designers and all their amazing fans who have participated in this past week with us!

Our blog winner is:


Emily said...

Such an awesome prize, thanks! Love that layout, such my style. And that wall hanging is simply adorable. Thanks for sharing!! I've added your link to my website's contests page.
November 17, 2011 1:17 PM

And our Facebook winner is:
hello- sent here from Imaginisce, and love you both!

Congrats to you both! Please email us at Gluegirl@gluearts.com with your info!! Look for our Black Friday Specials soon!! You'll definitely want to take advantage of these amazing sales!! 


You have read this article Extreme Adhesive Squares / Grace / Hot Glue Gun / Imaginisce with the title Imaginisce. You can bookmark this page URL https://skinnyminny22.blogspot.com/2011/11/happy-autumn-from-gluearts.html. Thanks!

Baking & Giving with GlueArts and Imaginisce

There is something about the holidays that stirs a desire to bake...and bake special treats!

In our household it's cookies, candies and candy covered marshmallows...oh and cheesecake that reign supreme! (and apple pie, chocolate pie, pecan pie...we could go on and on!lol)

Today's post is such a sweet treat in more ways then one! Designer Ania Lexander shares a very special Norwegian recipe that she has made and beautifully packaged!!! And Designer Linda Albrecht has a beautiful fall tin (love how she used the owl shape!!) and a yummy recipe to get your tummy growling!!

Simply Joy's Set
GlueArts Designer: Ania Lexander


Glue Arts: 


Other: 


Imaginisce: papers, stickers, canvas stickers, chipboard

staples, plastic bag, 

Maya Road: button, ribbon, pin, minitickets
Fiskars: edge puncher
Instructions:
 1. Put pieces of lefse (see below) in the bag, staple shut.

2. Cut out a rectangle, fold in the middle, staple onto the top of the bag. Attach chipboard using raisen's.
3. Cut out a long strip as a "belt" for the bag. Cut out a smaller rectangle, attach cute Imaginisce sticker onto the rectangle using raisen's, attach embellishments and write a note. Staple the rectangle onto the "belt" closing it around the bag.


4. Create a matching card
5. Put what you've created in a box and send it off to someone you love.


I recently started baking for Christmas - and decided to go for a traditional Norwegian sort of "cake/cookie" called lefse (Norwegian flatbread)..here's the wikilink in case you're curious (http://en.wikipedia.org/wiki/Lefse).
Here's an image of the lefse cooking...I'll admit..this is my 2nd time in my entire life I've attempted to make these...I got inspired by some elder women baking these effortlessly without breaking any sweat, making me think I could do this on my own too...cough...as you can see...I need lots and lots and lots of practice! (the ladies I interviewed had like, 55+ years of practice haha, so no wonder they fooled me into thinking this was easy ;p)

Nevertheless...
despite how the lefse turned out looking..it tasted lovely...and I got the urge to have my grandmother to taste them too.. I've been thinking it's about time to send her a card, so why not share a little of my life right now? She lives on the other side of the country, and I hope the lefse makes it alright across the mountains and still tastes well when it reaches her!

Happy Fall Tin Container
GlueArts Designer: Linda Albrecht

This container would be great for taking some of those favorite holiday cookies to your Thanksgiving gathering. I'm going to make my Great Aunt Cora's famous Gingersnaps to fill it with. They are the best Gingersnaps I've ever tasted! 

Supplies:
Glue Arts Glue Glider Pro with PermaTac Adhesive, U-Cut-It Foam and Glue Arts Hot Glue Gun and sticks


Imaginisce "Happy Harvest" patterned papers- Fall into Fun & Autumn Splendor
Imaginisce "Happy Fall" Chipboard Stickers and "Fall Friend"s Icon Die Cuts

Other:
Acrylic paint
Felt- Cream, golden yellow, olive, and burnt orange
small nest, feathers, and artificial berries
fabric and Fiberfill
Food safe Tin container with cover or latched cover

Instructions:
1. Lightly sand, prime, and paint lid and rims of tin container. Allow to dry then lightly sand to distress and coat with sealer (outside of tin only.)
 2. Cut desired piece of U-Cut-It foam to fit the lower backside of chipboard sticker. Layer 2 foam pieces on top of each other to make the chipboard piece sit high enough because of the fabric bow knot that you will be adding to the tin.
 3. Apply patterned paper to the bottom of the tin container, tie on a fabric bow then apply the chipboard sticker with the foam adhesive near the knot on the bow.
 4. String jute through a button then use Hot Glue Gun to adhere it to the center of the knot on the fabric bow.
 5. Cut 2 pieces of cream colored felt to the shape of the owl die cut using a pinking shears then machine sew the pieces to the backside of the owl. Stuff Fiberfill between the 2 felt pieces.
 6. Apply distress ink to the outside edges of the owl and all other desired paper embellishments that you will use.
 7. Adhere the small nest to the top of the tin container using lots of hot glue. Adhere the owl, a couple of feathers, berries, felt flowers & leaves and Imaginisce die cut leaves to decorate the nest and top of lid, again use hot glue.

 8. Add die cut leaves with hot glue near the bow on the bottom half of the container.
 9. Fill up with cookies and share with someone you love!

***************************************************
"Aunt Cora's Gingersnaps"
3/4 cup white shortening
1 cup white sugar
1 egg, beaten
4 TBSP dark molasses
2 tsp baking soda
2 cups flour
1/2 tsp ginger
1 tsp cinnamon

Mix shortening, sugar, egg and molasses in medium bowl. Mix remaining ingredients in a larger bowl then add first mixture. Form into walnut size ball, dip top in sugar and bake at 350 degrees until tops crack and bottom is lightly browned. Yum!

Make a double batch...you'll be sorry if you don't! :-)


Wow....talk about an amazing day of projects and recipes!!! We hope you agree as well and would like to invite you to post a comment to be entered to win the Imaginisce Happy Harvest collection along with our new Glue Glider Pro Handle, our PRO+ NEW Perma Tac Cartridge.


We'll also tuck in our 3D Combo Pac filled with our GlueArts Raisen's and our U Cut It Foam! Simply post a comment and you're entered to win! It's just that easy! We'll select one random winner next Monday and post their name right here on the GlueArts blog!


 We'd also like to invite YOU to share the Savings!!

Simply visit our Facebook page, locate this information on our wall and click share to share with your friends and family or share it to your Facebook wall! For sharing our savings promotion you'll be entered to win this prize package from our partners! 

You have through November 18th to help Share the Savings!!


How would you like an extra chance to win this week with Imaginisce? Simply visit their Facebook wall and like them! Then post a great big GlueArts hello to them!  You'll be entered to win a special GlueArts treat for doing so! You have through this weekend to pay them a visit!

You have read this article Ania / Imaginisce / Linda with the title Imaginisce. You can bookmark this page URL https://skinnyminny22.blogspot.com/2011/11/baking-giving-with-gluearts-and.html. Thanks!