Showing posts with label Studio Calico. Show all posts

Studio Calico and GlueArts Occupy Us Lately...

Lately...

We're working, blogging, crafting, creating, driving carpool, reading, watching, listening, writing, playing, smiling...

what about you???

Lately Layout
GlueArts Designer: Grace Tolman

I was in love with the Studio Calico classic kit that we get to use in this team up. I was especially inspired by all of the pattern papers. They are very sophisticated and so I decided to make a “me” page. It’s not often I do so and the papers went perfectly with my theme. 


Supplies Used:
Glue Arts Perma Tac
Glue Arts Raisen’s
Glue Arts U cut it foam
Cardstock- Bazzill
Pattern paper- Basic Grey; Sassafrass; Studio Calico; Pebbles
Letter stickers- Picadilly, Basic Grey
Butterfly chipboards- Sassafrass
Brads- Basic Grey
Stamp- Hero Arts
Die cut shape- Studio Calico
Pen- Creative Memories
Border punch- Martha Stewart Crafts, Fiskars
Thread- Coats and Clark
Sewing Machine- Kenmore
Ink- American Crafts, Tsukineko
Tape- Studio Calico
Square punch- Marvy Uchida

Instructions:

1. First off, mark 2” squares on the left side of the paper. Machine stitch the lines and then add a border punch to the top edge of the paper. 


2. Punch out squares from the pattern paper. I punched out two from each since they are double sided. Ink the edges with brown ink pad. 

3. Adhere the papers into the square spaces with Perma tac adhesive. 
4. Trim a piece from the lined paper, add a border punch to the left side of the paper and then adhere the letter stickers. Make the title stand out more by adding pen mark around the letter stickers. Ink the edges. 
5. Add some tape on the top and bottom right of the layout. 
6. Pick three chipboard butterflies and add brads to the centers. 

7. Adhere these chipboards in empty square spaces with Glue Arts Raisen’s. 
8. Mat the photo with black cardstock, trim and then adhere to the center of the card with Glue Arts Perma Tac. 
9. Stamp on one of the die cut starburst shape and then adhere that to the top left side of the page with Glue Arts Foam adhesive. 
10. After looking at the page from a far, I found that the light colored letter stickers are not very readable so I made them stand out more by adding pen lines around the letters. 


Well that wraps up our amazing two week journey with Studio Calico and their beautiful kits and products! We hope you've enjoyed the projects we've shared!

Today is the final chance to enter to win your own Studio Calico kit! 

The Studio Calico Field Guide is filled with papers, cardstock, alphabet stickers, brads, stickers, butterflies and a custom stamp exclusive to Studio Calico and the kit!

Simply post a comment and we'll enter you to win the same beautiful kit of supplies that the Glue Girls worked with along with a Glue Glider PRO and a new PRO+ Multidirection Flip Perma Tac Cartridge.(if you already own a PRO handle..we'll offer you a choice of the handle or another cartridge instead)


We hope you'll stop by tomorrow and do visit the Studio Calico blog for more ideas, inspiration...and to find out more about Studio Calico's monthly kits!  


The GlueArts team is headed to sunny Anaheim, California for the Winter 2012 CHA Craft & Hobby Trade Show!! We plan to blog directly from the show to share with you the latest trends products and more! So be sure to check in all next week to see what we're about to! For more information about CHA and GlueArts, please take a moment to visit our GlueArts CHA Winter 2012 page for more details about our events, make n takes and much more!


You have read this article Glue Gilder Pro / Grace / Raisen's / Studio Calico / U Cut It Foam with the title Studio Calico. You can bookmark this page URL https://skinnyminny22.blogspot.com/2012/01/studio-calico-and-gluearts-occupy-us.html. Thanks!
It's a "Lovely" Day Today with GlueArts & Studio Calico

Some days I write a little prose, talk a bit about this or that...while other days the words don't come quite so easily.

Today is one of those. And it's not because Designer Linda Albrecht's project isn't amazing, beautiful and wonderful.

It's because today's project from Linda IS ALL of those plus a million other superlatives. I find myself anxious for you to see what she has made...and feel the same way we (and I) do!!!
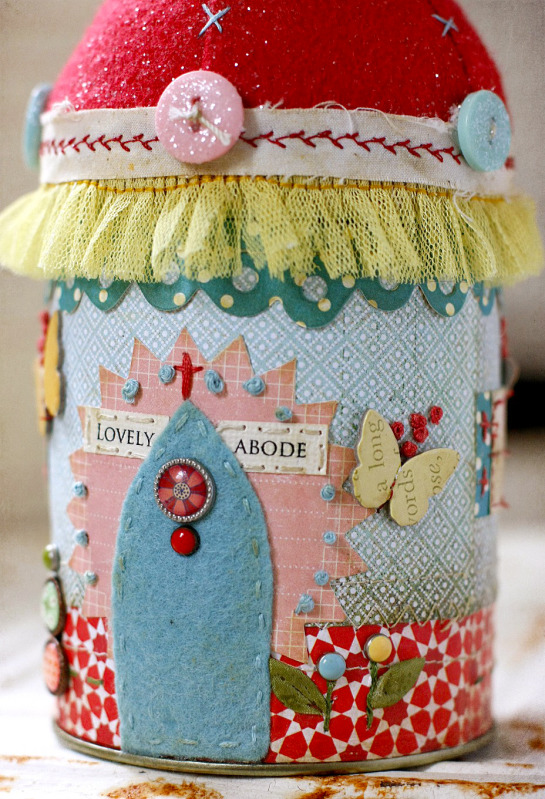
"Lovely Abode" Pincushion Container
GlueArts Designer: Linda Albrecht


Use a metal gift can available in craft stores to make this little house shaped pin cushion. Store extra pins or a small scissors inside the can or you can fill the can with a small gift for a sewing friend.


Supplies:
Glue Arts Hot Glue Gun & sticks
Glue Arts DryStick Mounting Squares & Micro Extreme Adhesive Squares
Studio Calico "Field Guide" Kit
Other:
Wool Felt- Sweet Emma Jean's Etsy Shop
Embroidery floss & buttons
Trinket pins & bead- Maya Road
Crackle paint- Clear Rock Candy by Ranger
Metal gift can


Instructions:
1. Measure and cut patterned papers to fit around can then use Perma Tac Adhesive to layer.
2. Use sewing machine to stitch on layered papers near paper edges and along the scalloped paper trim.

3. Cut cardstock for windows & a strip the same width as the windows then adhere windows to the strip using DryStick mounting squares.
4. Apply embellishments onto the layered papers as desired. Cut a door from felt and hand stitch with embroidery floss. Machine stitch window panes onto window bases. Apply chipboard butterflies with Micro Extreme Adhesives squares and embroider french knots where desired.

5. Apply Clear Rock Candy Crackle paint to the finished windows and allow to dry.
6. Apply brads where desired and flatten prongs well.
7. Cut 5 triangular pieces from red wool felt and machine sew together.

8. Use Perma Tac Adhesive to adhere the completed paper piece to the circumference of the can.

9. Use hot glue to adhere about half of the felt roof to the can cover and allow to dry for a minute then begin to add fiberfill to stuff the roof top. Adhere the rest of the felt roof the the can cover once stuffed.

10. Apply buttons at the bottom of the roof along the seams. 
11. Apply trims along the can lid to cover edge of roof felt with hot glue.


Are you all just stunned and shaking your heads in amazement as we did? Imagine an entire "village" of these amazing homes...pretty spectacular!!

Well GlueArts would like to help you be able to create this masterpiece along with many of the other projects we've shared this week and last. Simply post a comment and we'll enter you to win ...


The Studio Calico Field Guide is filled with papers, cardstock, alphabet stickers, brads, stickers, butterflies and a custom stamp exclusive to Studio Calico and the kit!

Simply post a comment and we'll enter you to win the same beautiful kit of supplies that the Glue Girls worked with along with a Glue Glider PRO and a new PRO+ Multdirection Flip Perma Tac Cartridge.(if you already own a PRO handle..we'll offer you a choice of the handle or another cartridge instead) And as a surprise we're also going to include our Designer favorite GlueArts Hot Glue Gun too!!


We hope you'll stop by tomorrow and do visit the Studio Calico blog for more ideas, inspiration...and to find out more about Studio Calico's monthly kits!  


If you're headed to CHA this weekend we hope you'll be sure to stop by the GlueArts booth! We have make n takes and more planned! We're in booth #2333!! Be sure to take a moment to visit our GlueArts CHA Winter 2012 page for more details about our events, make n takes and much more!

You have read this article Linda / Studio Calico with the title Studio Calico. You can bookmark this page URL https://skinnyminny22.blogspot.com/2012/01/it-day-today-with-gluearts-studio-calico.html. Thanks!

A Day of Firsts With Studio Calico and GlueArts PRO+

Studio Calico

A kit club and amazing product line.

The monthly kit club is filled with an amazing, eye-pleasing assortment of papers, cardstock, embellishments, chipboard, stamps and more. In fact often it's the kit is packaged and put together so amazing...well some of us have  a hard time breaking it up!lol)

They also offer extra add-on kits that enhance the main kit, offer another fun theme and make you wish you could purchase one of each!! It's slightly addictive and altogether wonderful! Here's an example of one of their kits and add-ons.


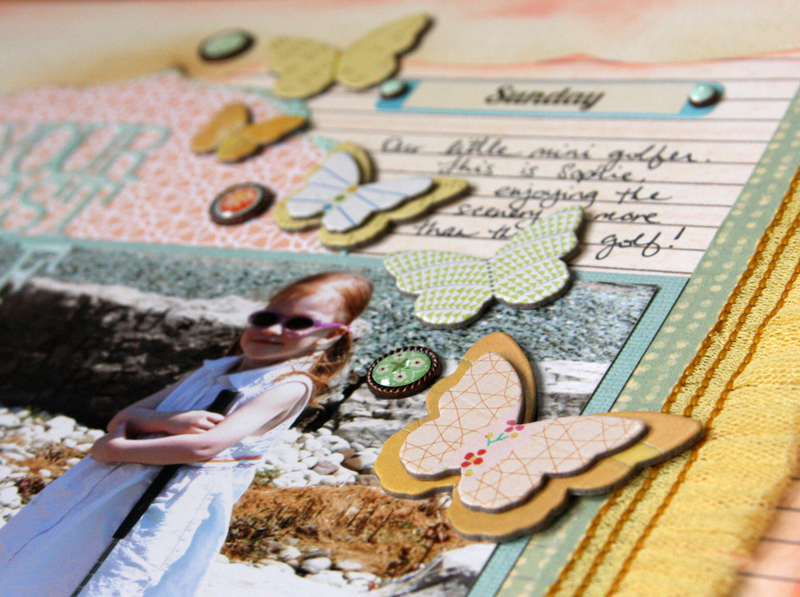
Our Designers all commented time and time again how much they enjoyed  working with the kit...proof is in the pudding...here's a beautiful layout from Designer Lesley Langdon!

First Golf
GlueArts Designer: Lesley Langdon


Supplies:
Glue Arts Glue Glider Pro (Perma Tac Adhesive)
Glue Arts Extreme Adhesive Squares
Glue Arts Ribbon Adhesive
Studio Calico Kit (Field Guide)
Spellbinders Die Templates (Grand Labels Four, Grand Labels One, Grand Big Scalloped Ovals)
Clearsnap Ink (ColorBox Queue)
Antique Linen Distress Ink by Ranger
Cut n Dry Foam by Ranger


Instructions:
1. Die cut grand labels from different papers. On one, apply tape and trim with Glue Arts Ribbon Adhesive.

2. Ink all edges with pigment ink.

3. Adhere papers to cardstock background with your Glue Glider Pro (Perma Tac Adhesive). Ink around the die cut papers with Antique Linen Distress ink, using a foam applicator.


4. Make rosette flower and stack layers using Glue Arts Extreme Adhesive Squares.

5. Adhere decorative tape, one layer, ruffle it when applying, the other tape, lay flat on top. 
6. Adhere rosette flower and chipboard butterflies to the layout with Glue Arts Extreme Adhesive Squares.


7. Adhere brads and sticker letters for the title.
8. Add journaling and ink around the cardstock background edges.


Beautiful!!! So tell us...are you a 12 by 12 scrapper. Do you tend to scrapbook more holidays and special events...or also every day moments? Do you make cards? Altered projects? Jewelry?

We'd love to hear from you and a bit about your holidays! And for posting a comment...


we'll enter you to win the same amazing kit from Studio Calico that our team of designers worked with! 

The Studio Calico Field Guide is filled with papers, cardstock, alphabet stickers, brads, stickers, butterflies and a custom stamp exclusive to Studio Calico and the kit!

Simply post a comment and we'll enter you to win the same beautiful kit of supplies that the Glue Girls worked with along with a Glue Glider PRO and a new PRO+ Multdirection Flip Perma Tac Cartridge.(if you already own a PRO handle..we'll offer you a choice of the handle or another cartridge instead)


We hope you'll stop by tomorrow and do visit the Studio Calico blog for more ideas, inspiration...and to find out more about Studio Calico's monthly kits!  


And for all of our CHA Friends coming to see us at the Winter Craft & Hobby Trade Show...we'll see you soon!! Be sure to take a moment to visit our GlueArts CHA Winter 2012 page for more details about our events, make n takes and much more!
You have read this article Lesley / Studio Calico with the title Studio Calico. You can bookmark this page URL https://skinnyminny22.blogspot.com/2012/01/a-day-of-firsts-with-studio-calico-and.html. Thanks!

You Simply Amaze Me with Studio Calico &GlueArts!!

You simply amaze me....this team of Designers simply amaze me..us...and we're betting they amaze you too!

Each day we think it just can't get any better and we can't find another amazing project to share with you...and our team just keeps bringing sharing more and more!!!

Designer Kristen Swain is responsible today for this beauty!! (We love how she layered the butterflies!!) She has crafted such a beautiful layout that hopefully will inspire you.


You Simply Amaze Me Layout
GlueArts Designer: Kristen Swain

Supplies:
Glue Arts- Perma tac, Adhesive Squares and Mini Adhesive Squares 

Studio Calico Kit
Black Pen


1. Use paper block and adhere trim to backside of block using Adhesive Squares.

2. Use Perma Tac to adhere photos to layout, then more Perma tac to adhere tags to layout, and small star burst tags along side of photos.


3. Adhere butterflies to layout using Mini Adhesive Squares, doubling some butterflies for layers.
4. Use sticker letters to create title.

5. Use paper and washi tape to create strips across layout, adding brad to blue strip.

6. Journal on scrap paper and adhere to layout with Perma Tac.


Would you like to make some of the projects you've seen shared on the GlueArts blog? We'd love to help you with that!!

The Studio Calico Field Guide is filled with papers, cardstock, alphabet stickers, brads, stickers, butterflies and a custom stamp exclusive to Studio Calico and the kit!

Simply post a comment and we'll enter you to win the same beautiful kit of supplies that the Glue Girls worked with along with a Glue Glider PRO and a new PRO+ Multdirection Flip Perma Tac Cartridge.(if you already own a PRO handle..we'll offer you a choice of the handle or another cartridge instead)


We hope you'll stop by tomorrow and do visit the Studio Calico blog for more ideas, inspiration...and to find out more about Studio Calico's monthly kits!  


And for all of our CHA Friends coming to see us at the Winter Craft & Hobby Trade Show...we'll see you soon!! Be sure to take a moment to visit our GlueArts CHA Winter 2012 page for more details about our events, make n takes and much more!
You have read this article Adhesive Squares / Glue Gilder Pro / Kristen / Perma Tac / Studio Calico with the title Studio Calico. You can bookmark this page URL https://skinnyminny22.blogspot.com/2012/01/you-simply-amaze-me-with-studio-calico.html. Thanks!