Happy Saturday!!
We're doing something different this week and have a post for you today!!
This one just pulls at my heartstrings!
Getting a little personal today as this Glue Girl is confessing her love of all things bunny! (it's even my nickname!)
So when we saw this beauty by Linda Albrecht...we could not wait to share this with you today!
Supplies:
Glue Arts Glue Glider Pro with Fabric Bond, Ribbon Adhesive, White Accent- It-All Vinyl, Hot Glue Gun and sticks
Miscellaneous Fabric, Buttons, Trims & lace
Cotton Thread & needle
Mini wood fencing
Scrapbook paper
Brown inkpad for distressing
Sewing Machine
Instructions:
1. Cut banner pieces from fabrics. Cut bunnies from Accent it All vinyl. Apply white vinyl to the back scrapbook paper for "ruffle trim".
We're doing something different this week and have a post for you today!!
This one just pulls at my heartstrings!
Getting a little personal today as this Glue Girl is confessing her love of all things bunny! (it's even my nickname!)
So when we saw this beauty by Linda Albrecht...we could not wait to share this with you today!
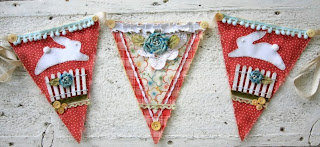
Spring Bunny Banner
Designer: Linda Albrecht
Supplies:
Glue Arts Glue Glider Pro with Fabric Bond, Ribbon Adhesive, White Accent- It-All Vinyl, Hot Glue Gun and sticks
Miscellaneous Fabric, Buttons, Trims & lace
Cotton Thread & needle
Mini wood fencing
Scrapbook paper
Brown inkpad for distressing
Sewing Machine
Instructions:
1. Cut banner pieces from fabrics. Cut bunnies from Accent it All vinyl. Apply white vinyl to the back scrapbook paper for "ruffle trim".
2. Apply the bunnies to two of the banner pieces then machine stitch around the outside edges of the bunnies. Adhere or machine stitch a pom pom trim to the tops of the same two banner pieces.
3. Distress a piece of mini wood fencing then hot glue it to the banner pieces just below the bunnies.
4. Add additional trims as desired. See how to make the fabric flowers in step 7 below.
5. Cut white vinyl & Scrapbook paper strip to measure 12x12" then accordion fold to fit across banner piece.
6. Apply desired embellishments to the top of the remaining banner piece then machine sew the ruffled white vinyl piece to the top edge.
7. Make fabric flowers using 2" strips of fabric that you twist and coil as you hot glue it to the banner piece.
8. Hand sew French Knots to the centers of the fabric flowers.
9. Adhere the completed banner pieces to twill, sew buttons at each banner corner and distress all with a brown inkpad if desired.
Is that not just inspiring and amazing all at the same time?? We thought so too! Like we said it's just been one amazing week! And our new designers played a big role in this! We hope you agree!
Since today is a special post and we'd very much like to give you one more added opportunity to win a Picture Keeper product...here's today's request.
Today happens to be the birthday of the owner and creater of Picture Keeper! And we happen to know that he's a really really nice guy! So...if you have not yet become a friend of Picture Keeper please do so. If you already have this week...then would you please go post a Happy Birthday to Matt wish! And let him know GlueArts sent you too!
Then post here you've done so for one more added chance to win! And we're upping the ante...not only are we giving away a PK4 and a color each of our Accent It All and our Extreme Adhesive Squares...we're going to add in our new Golden Yellow Accent It All vinyl and what the heck...our GlueArts Hot Glue Gun!!!
Happy Saturday! See you Monday when we'll announce this week's winners...it might be YOU!!
You have read this article Accent It All /
Fabric Bond /
Glue Gilder Pro /
Hot Glue Gun /
Linda /
Ribbon Adhesive
with the title Accent It All Spring Bunny Banner. You can bookmark this page URL https://skinnyminny22.blogspot.com/2011/04/accent-it-all-spring-bunny-banner.html. Thanks!


