Good Monday to you and please join us in welcoming a brand new company and sponsor ...
Lawn Fawn!
Lawn Fawn is known for their fun and creative acrylic stamps and we hope you'll join us all week long as
we share endless ways for you to use their products!
Designers Patti Milazzo and Audrey Pettit have two ways to create today that both cheer the spirit!
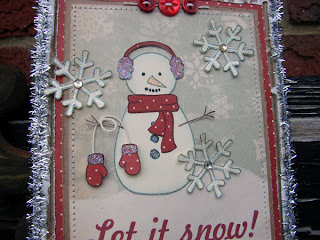
Let it Snow Hanging
GlueArts Designer: Audrey Pettit
Supplies:
Glue Arts Micro Extreme Adhesive Squares
Lawn Fawn Making Frosty Friends and Frosties Stamp Sets
Cosmo Cricket Journaling Card
We R Memory Keepers Patterned Paper
Kraft Outlet Cardstock and Hang Tag String
Webster's Pages Pom Pom and Tinsel Trim
May Arts Satin Ribbon
Prima Gems
Foofala Buttons
Prisma Colored Pencils and Gamsol
Donna Salazar Designs Corrugated Cardboard for Zutter
Delta Paint
Martha Stewart Glitter
Close to my Heart Ink
1. Peel the top layer from a 5" x 7" piece of corrugated cardboard. Paint cardboard with white paint.
2. Apply Glue Arts Ribbon Adhesive to the edges of the cardboard and adhere tinsel trim all around the outside edge.
3. Cut polka dot patterned paper to 4.25" x 5.5" and layer with kraft cardstock and a printed journaling card. Stitch around the journaling card and adhere the paper to the center of the cardboard base. Use Glue Arts High Tac Adhesive for all layers.
4. Stamp snowman image onto ivory cardstock using light grey ink. Color image using colored pencils blended with Gamsol. Cut out snowman and adhere to the journaling card.
5. Stamp snowman's scarf, earmuffs and mittens onto patterned paper and trim out.
6. Adhere scarf and earmuffs to the snowman image. Hang mittens over an arm using hang tag string. Apply glitter to the mitten cuffs, earmuffs, carrot nose, and coal buttons.
7. Stamp three large snowflakes onto ivory cardstock. Cover with glitter and cut out. Adhere to the hanging using Glue Arts Micro Extreme Adhesive Squares. Add gems to the snowflake centers with more micro squares.
8. String three buttons together with hang tag string and adhere to the top of the hanging using Micro Extreme Adhesive Squares.
9. Adhere pom pom trim across the bottom of the hanging using Glue Arts Ribbon Adhesive. Tie a bow from satin ribbon and adhere with more Ribbon Adhesive.
10. Adhere a length of pom pom trim at the top for the hanger.
Enjoy!
Friends Warm the Heart Card
GlueArts Designer: Patti Milazzo
Supplies:
Glue Arts-
Glue Glider Pro
1/4 Perma Tac PRO+ Cartridge Refill - ProInstructions:
2. Next, I cut out the images with a craft knife / fine tip scissors.
4. I used a mix of adhesives: U-Cut-It Adhesive Foam, Mini Adhesive Squares and the Pro+ Perma Tac Adhesive to adhere the cut out stamped images. I gave dimension to the trees, birds, and snowflakes with the U-Cut-It Adhesive Foam.
5. I also added a large piece of U-Cut-It Adhesive Foam to the back of the rectangle and adhered it to the kraft cardstock.
7. To finish the card, I stamped the greeting onto snowflake pattern paper and cut it into short strips. I also punched out a heart and small circle from cardstock and pattern paper. I stamped the heart image in the center of the punched heart. I adhered all of these pieces to the right side of the card using the U-Cut-It Adhesive Foam.
So did you love today's projects?! Would you like to win some products to create your own projects? We'd like to invite you to enter to win the beautiful Lawn Fawn Ornate Ornaments stamp set!!
Along with our Glue Glider Pro and our NEW PRO+ cartridge! Plus we'll tuck in our U Cut It Foam pack!!!
Just leave a comment here and we'll select one random winner next week!!
We would also like to invite you to stop by and visit the Lawn Fawn Blog and see what they've created with our GlueArts Adhesives and their fantastic stamps!
Last before we leave you today...we'd like to announce our Holiday winner and that is..
Fantastic inspiration today!!! of course I love videos, but I don't watch every one that I see come across my screen. This however was a great idea and a video was much appreciated!
You have read this article Audrey /
Extreme Adhesives Mini Sqaures /
Glue Gilder Pro /
Lawn Fawn /
Mini Adhesive Squares /
Patti /
Ribbon Adhesive /
U Cut It Foam
with the title Please Welcome Lawn Fawn to GlueArts!!. You can bookmark this page URL http://skinnyminny22.blogspot.com/2011/12/please-welcome-lawn-fawn-to-gluearts.html. Thanks!


