
Today is one of those. And it's not because Designer Linda Albrecht's project isn't amazing, beautiful and wonderful.
It's because today's project from Linda IS ALL of those plus a million other superlatives. I find myself anxious for you to see what she has made...and feel the same way we (and I) do!!!

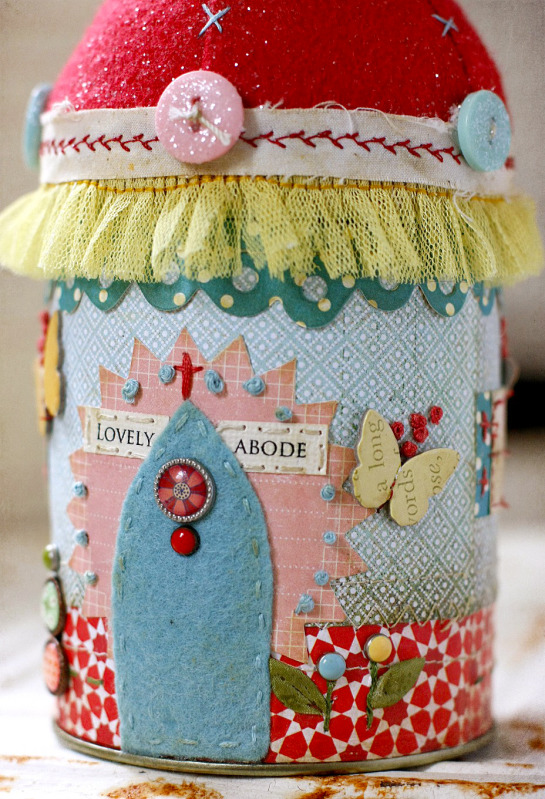
"Lovely Abode" Pincushion Container
GlueArts Designer: Linda Albrecht
Use a metal gift can available in craft stores to make this little house shaped pin cushion. Store extra pins or a small scissors inside the can or you can fill the can with a small gift for a sewing friend.
Supplies:
Glue Arts Hot Glue Gun & sticks
Glue Arts DryStick Mounting Squares & Micro Extreme Adhesive Squares
Studio Calico "Field Guide" Kit
Other:
Wool Felt- Sweet Emma Jean's Etsy Shop
Embroidery floss & buttons
Trinket pins & bead- Maya Road
Crackle paint- Clear Rock Candy by Ranger
Metal gift can
Instructions:
1. Measure and cut patterned papers to fit around can then use Perma Tac Adhesive to layer.

2. Use sewing machine to stitch on layered papers near paper edges and along the scalloped paper trim.
3. Cut cardstock for windows & a strip the same width as the windows then adhere windows to the strip using DryStick mounting squares.

4. Apply embellishments onto the layered papers as desired. Cut a door from felt and hand stitch with embroidery floss. Machine stitch window panes onto window bases. Apply chipboard butterflies with Micro Extreme Adhesives squares and embroider french knots where desired.


5. Apply Clear Rock Candy Crackle paint to the finished windows and allow to dry.

6. Apply brads where desired and flatten prongs well.

7. Cut 5 triangular pieces from red wool felt and machine sew together.

8. Use Perma Tac Adhesive to adhere the completed paper piece to the circumference of the can.

9. Use hot glue to adhere about half of the felt roof to the can cover and allow to dry for a minute then begin to add fiberfill to stuff the roof top. Adhere the rest of the felt roof the the can cover once stuffed.


10. Apply buttons at the bottom of the roof along the seams.
11. Apply trims along the can lid to cover edge of roof felt with hot glue.

Are you all just stunned and shaking your heads in amazement as we did? Imagine an entire "village" of these amazing homes...pretty spectacular!!
Well GlueArts would like to help you be able to create this masterpiece along with many of the other projects we've shared this week and last. Simply post a comment and we'll enter you to win ...

The Studio Calico Field Guide is filled with papers, cardstock, alphabet stickers, brads, stickers, butterflies and a custom stamp exclusive to Studio Calico and the kit!
Simply post a comment and we'll enter you to win the same beautiful kit of supplies that the Glue Girls worked with along with a Glue Glider PRO and a new PRO+ Multdirection Flip Perma Tac Cartridge.(if you already own a PRO handle..we'll offer you a choice of the handle or another cartridge instead) And as a surprise we're also going to include our Designer favorite GlueArts Hot Glue Gun too!!

We hope you'll stop by tomorrow and do visit the Studio Calico blog for more ideas, inspiration...and to find out more about Studio Calico's monthly kits!

If you're headed to CHA this weekend we hope you'll be sure to stop by the GlueArts booth! We have make n takes and more planned! We're in booth #2333!! Be sure to take a moment to visit our GlueArts CHA Winter 2012 page for more details about our events, make n takes and much more!
You have read this article Linda /
Studio Calico
with the title It's a "Lovely" Day Today with GlueArts & Studio Calico. You can bookmark this page URL http://skinnyminny22.blogspot.com/2012/01/it-day-today-with-gluearts-studio-calico.html. Thanks!


