We're so excited!
This is a first for us at the GlueArts Blog!
First that yes...we've paired up with Studio Calico and second...their amazing kits!
It's double the fun knowing we have Studio Calico products combined into their beautiful monthly kits!
For those that are not familiar with SC...over the next two weeks we'll be sharing products, projects and all sorts of fun information about how SC came to be!!
The Designers were sent one of the Studio Calico kits...these kits are filled with embellishments, papers, cardstock and Studio Calico exclusive stamps and sent off on a mission to create. What's fascinating to know is that all the Glue Girls Designers received the same products...same adhesives...however the amazing diversity of projects shows the endless possibilities you can create with a Studio Calico Kit and GlueArts Adhesives!
Designer Audrey Pettit is kicking off our two weeks with Studio Calico...she created the most amazing butterfly gift bag....almost too pretty to call a gift bag...don't you agree?
Annette said...
This is a first for us at the GlueArts Blog!
First that yes...we've paired up with Studio Calico and second...their amazing kits!
It's double the fun knowing we have Studio Calico products combined into their beautiful monthly kits!
For those that are not familiar with SC...over the next two weeks we'll be sharing products, projects and all sorts of fun information about how SC came to be!!
The Designers were sent one of the Studio Calico kits...these kits are filled with embellishments, papers, cardstock and Studio Calico exclusive stamps and sent off on a mission to create. What's fascinating to know is that all the Glue Girls Designers received the same products...same adhesives...however the amazing diversity of projects shows the endless possibilities you can create with a Studio Calico Kit and GlueArts Adhesives!
Designer Audrey Pettit is kicking off our two weeks with Studio Calico...she created the most amazing butterfly gift bag....almost too pretty to call a gift bag...don't you agree?
Butterfly Gift Bag
GlueArts Designer: Audrey Pettit
Supplies:
Studio Calico Kit
SEI and Stampin'Up Ink
Kraft Outlet Hang Tag String
Craft Supply Mesh Handled Gift Bag
1. Gather your supplies.
2. Measure the front of a mesh gift bag and cut a piece of patterned paper slightly smaller than your dimensions. Cut 3 panels of contrasting patterned paper and adhere them to the large piece using Glue Arts High Tac Adhesive. Machine stitch the edges of the 3 rectangles.
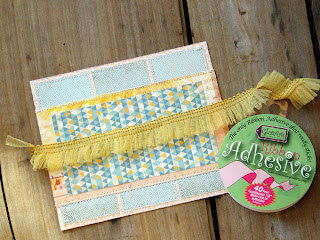
3. Adhere a third strip of patterned paper across the center of the base. Machine stitch the edges. Add a printed card to the center. Affix trim across the middle using Glue Arts Ribbon Adhesive.
4. Stamp the You Are Here image at the bottom of a shipping tag using orange ink. Stamp partial images of two arrows in blue ink on either side. Add strips of washi tape above the stamped sentiment going up the tag. Adhere journaling card to the center of the tag. Adhere a sun-burst die cut to the tag using Glue Arts U Cut It Foam Adhesive. Affix tag to the center of the gift bag using more U Cut It Foam.
5. Layer 3 chipboard butterflies together using Glue Arts Micro Extreme Adhesive Squares. Cut the metal prongs off a brad and attach to the center with the squares. Add a piece of trim to the back for the antenna. Affix to the middle of the tag using U Cut It Foam Adhesive.
6. Layer 3 more sets of butterflies and add hang tag string to the backs for the antennae. Adhere butterflies on either side of the tag using Micro Extreme Adhesive Squares.
7. Attach remaining piece of trim to the gift bag handle. I stapled it on using the strip of kraft cardstock that the trim was wrapped up in from the kit. Add the last layered butterfly to the strip.
How fun is that?!! Imagine this same created inside a wood frame or on a canvas...stunning! We'd love for you too to have an opportunity to create with Studio Calico and GlueArts! Simply post a comment and we'll enter you to win the same beautiful kit of supplies that the Glue Girls worked with along with a Glue Glider PRO and a new PRO+ Multdirection Flip Perma Tac Cartridge. (if you already own a PRO handle..we'll offer you a choice of the handle or another cartridge instead)
We'd like to send out a big note of thanks to Momenta and their talented team of designers. We absolutely enjoyed our partnership with them last week and loved seeing all the ways they created using GlueArts Adhesives! It's time though to announce last week's Momenta winner and that is.... (drumroll please!!)
wow these projects are so amazing...I lam loving this paper. Can't wait to see what tomorrow brings..Thanks for sharing..
You have read this article Audrey /
Glue Gilder Pro /
Pro+ /
Ribbon Adhesive /
Studio Calico /
U Cut It Foam
with the title Please Welcome...Studio Calico To the GlueArts Blog!. You can bookmark this page URL http://skinnyminny22.blogspot.com/2012/01/please-welcomestudio-calico-to-gluearts.html. Thanks!


