

Designer Danielle Flanders has the sweetest snowy layout that many of you will be anxious to recreate with the recent snowfalls across the country.
Leslie Ashe...we shoot...that is one of the cutest snowman cards and we loved her sentiment!
Feeling a bit like a mini album...then Jessica's book is just what you need! We've got a little something for everyone and a new way for you to win!


Snow Fun Layout
Designer: Danielle Flanders
Supplies:Echo Park's Wintertime line of papers and stickers
Glue Arts' Perma Tac refill and Glue Glider Pro, Dimensional Adhesive
1 wallet sized photo
white ribbon
pearls
twine
border punch
corner rounder
Instructions:
Step 1:
Create an 8 1/2" x 11" background from kraft cardstock. Cut the Falling Snowflakes paper slightly smaller and round the corners. Adhere to center. Cut the Snow paper 8 1/2" x 5". Round corners. Adhere. Add a blue border sticker. Adhere the large white swirl sticker over the top.

Cut a piece of red cardstock 5 1/2" x 2 1/2". Punch the top of this piece with a border punch. Tie a white ribbon around it into a knot. Add a blue snowflake sticker to the knot and a pearl. Cut a piece of Stripes paper 4 1/2" x 1 1/4". Adhere. Print out wallet sized photo and adhere.

Attach "snow", "fun" stickers to the round winter sticker. Pop up with Glue Arts dimensional adhesive. Adhere to red cardstock.

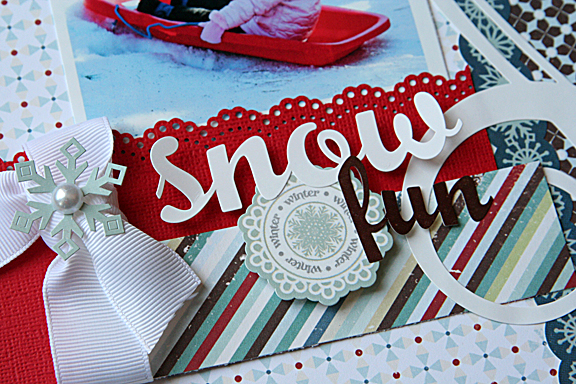
Cut a piece of twine to hang the mittens. Attach mitten to each end of twine. Wrap the mittens around the title and pop them up onto page with dimensional adhesive.


Add journaling strips.


Your Fireplace or Mine Card
Designer: Leslie Ashe
Supplies:
Echo Park Winter Patterned Paper & Stickers
Glue Arts 3D U Cut It combo Pack, Glue Glider Pro with Perma Tac & Extreme Adhesive Squares.
Tonic edge distresser
Martha Stewart bone folder
American Crafts kraft cardstock
EK Success corner rounder
Jolee's Swarovsky Crystals


-cut Echo Park patterned paper (of your choice) 6x12 inches, fold & score.
-cut a different Echo Park patterned paper (of your choice) 5"
-cut kraft cardstock 4" &
-round the edges of each paper, distress with distress tool & ink if desired.
-cut "snow" border from Echo Park patterned paper to 6", distress sides & tear at end.
-place 2nd (in this case, the red EP paper) in center of 1st EP folded patterned paper.
-place kraft cardstock in center
-using GlueArts 3D Ucut it Combo pack, glue snowman to bottom left of kraft cardstock.
-add blue EP snowflake sticker to bottom right of snowman & add jewel to center
-cut small light blue EP snowflake sticker in half and place one half to top left, under kraft cardstock slightly.
-add other half under kraft cardstock at bottom right
-add "snow" border under snowman, directly to center of kraft cardstock
-add sentiment "your fireplace" right above using EP letter stickers
-add sentiment "or mine?" directly below "snow" border using EP letter stickers
-add 2 larger EP snowflake stickers to top right, slightly staggering. Make the smaller one 3D using GlueArts 3D Ucut it foam.
-add smaller snowflake circles to center & place jewels on top.


Echo Park Wintertime Fun Album
Designer: Jessica Barnett
Supplies:
Glue Arts Hot Glue Gun
Glue Arts Extreme Adhesive Squares
Glue Arts Glue Glider Pro and Perma Tac refill
Glue Arts U-Cut it foam adhesive
Echo Park Wintertime Paper pack
Red 8x8 fabric album
Glitter glue
Scissors
Paper trimmer
Corner rounder
Ribbon
Paper flowers
Brown ink pad
Instructions:
1. Choose one 4x6 photo for each of your pages and ink the edges. Layer the papers with the photos, leaving swirls and other details on the papers visible as you lay the pages out. Ink all papers.
2. Use the Glue Arts Glue Glider Pro and the U-Cut it foam to attach your papers and pictures to all the pages.
3. Use the included stickers to embellish the pages.


4. Use the glitter glue to add extra sparkle to the papers and stickers.
5. For the album, use Glue Arts Extreme Adhesive Squares to attach papers and small embellishments to the album front and use the Glue Gun to attach heavier chipboard die-cuts. Re-cover the album with the plastic sleeve to keep it from getting dusty.
HINT: You can add dimension with the stickers by adding the U-Cut it foam to the back of the stickers. Just attach pieces of the foam to the back of the sticker you want to lift off the page and leave the paper backing on the side of the foam still facing up.
We're moving onto Day Four of our week with Echo Park Paper...we know many of you are crazy about the new Echo Park Paper Little Girl line!

The Little Girl line is filled with cupcakes, crowns, sweet dots and hearts...a little bit of everything sweet!!
Let us know what is your favorite sweet treat....and we'll enter you to win this sweet Little Girl collection along with our best seller...our Glue Glider Pro and a cartridge of your choice of for the Pro!!

We'll give you through tomorrow to leave us a comment and let us know your sweet treat of choice!!
We need to though let you know who was the winner of yesterday's Wintertime Collection and for the first time ever a Glue Glider MAX and refill of their choice! The winner is:
Gorgeous projects!!! Wow on the bird nest...I can't believe you guys are giving away a max today!!! I hope i win!! Thanks for the chance!!
Rebecca Minor
buzzybeedesigns(AT)yahoo(DOT)com
Rebecca Minor
buzzybeedesigns(AT)yahoo(DOT)com
You have read this article 3D Combo Pac /
Danielle /
Extreme Adhesives Mini Sqaures /
Glue Gilder Pro /
Leslie /
Perma Tac
with the title A Bit of Snow Fun. You can bookmark this page URL http://skinnyminny22.blogspot.com/2011/01/a-bit-of-snow-fun.html. Thanks!


