
 |
| source |
We've got a little of this and that for you today.
Last week...wow...what an amazing week here on our blog and on our Facebook wall. Thank you to all of our fans who invited their friends to come follow up! And a very warm welcome to all of our new fans. We hope if you have not...you'll sign up to receive our blog emails. This will let you know when the blog is updated! So please sign up! Just takes a click on the left hand side of the blog.
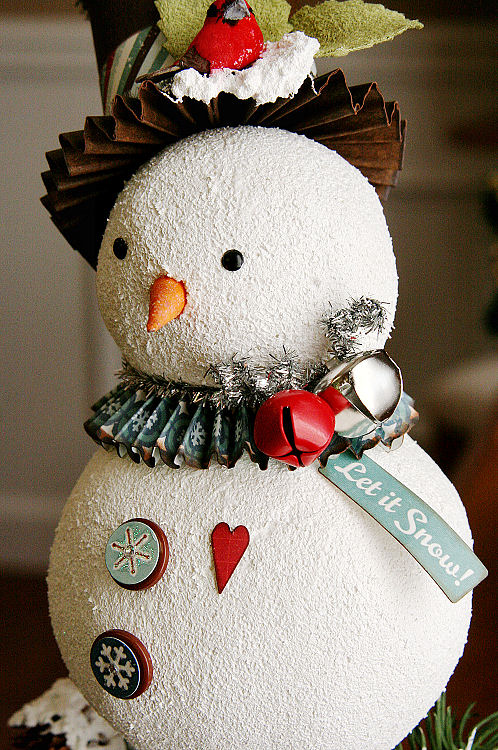
For today we have one more amazing Echo Park Paper Wintertime project to share with you. Designer Patti Milazzo made this Sweet Snowman Topiary (love this!!!)....and we're showing all week some more ideas for using The Girls' Paperie line too!

Snowman Topiary
Designer: Patti Milazzo
Designer Tip: One of my favorite products by Glue Arts is the Glue Gun. It is by far the tool I reach for again and again when I’m doing crafty home décor projects. I’ve found that I can use it on virtually any surface and in tiny and large amounts, plus it heats quickly and doesn’t drip on my work surface. This wintery Snowman Topiary is sure to brighten up the gloomy days this season and it’s the perfect example of how much I love to use this Glue Gun.
Supplies:
Glue Arts:
Glue Glider Pro with
1/4 Perma Tac Cartridge Refill - Pro
3D Combo Pac – U Cut It
Extreme Adhesive Squares
Glue Gun
Glue Gun Sticks
Echo Park: Wintertime Alpha Stickers (snowflake border)
Wintertime Element Stickers
Wintertime pattern papers – Berries, Stripes, Flurry and Falling Snowflakes
3” and 4” Styrofoam balls; 4”H x 3”D terra cotta flowerpot; ¼”D x 12”H wooden dowel; white, brown and light blue acrylic paints; glitter paint and glitter glue; silver tinsel wire stems; red and silver jingle bells; green floral moss and floral picks; floral foam (inside flowerpot); floral mini mushroom bird; Snowtex; buttons; black mini brads;
Instructions:
1. Paint flowerpot light blue and brown and set aside to dry.
2. Push wooden dowel through Styrofoam balls to create snowman. Remove the pieces, apply hot glue inside the holes with the Glue Arts Glue Gun and reinsert the dowel.
3. Paint the Styrofoam balls and exposed part of the dowel with white paint mixed with glitter paint/glue and set aside to dry thoroughly.
4. To create the snowflake medallion, start by cutting 2 – 12” x 1 ½ “ strips of Falling Snowflakes pattern paper. I cut one edge of both strips with a scallop edge trimmer blade. Ink the edges with brown ink, then accordion fold at 1/8” – 1/4" increments. To make mine easier to fold, I ran the strips through a crimping tool first.

6. Punch/cut a 2” circle from red pattern paper (Berries) and use an Extreme Adhesive Square to affix to the front of the accordion circle. Then apply the snowflake sticker and adhere the small circle snowflake sticker with a piece of U-Cut-It Adhesive Foam. Apply glitter glue and tiny gems, then set it aside to dry.
7. In the meantime, cut a piece of floral foam to fit inside the flowerpot – just below the top rim. Apply hot glue inside the pot and push in the foam in securely. Insert the bottom of the wooden snowman dowel into the center of the floral foam and remove. Apply hot glue inside the hole and reinsert the dowel. Again, use the Glue Gun to apply hot glue on the top surface of the foam to affix the moss and various winter themed floral pieces.

Tip: Prior to apply the medallion to the flowerpot, color the sides of the foam with a coordinating marker. I used brown to blend in with the flowerpot rim and the back of the medallion. This makes the white adhesive foam less noticeable from the side.


10. To decorate the snowman, again create 2 strips (1/2” wide) of scalloped pattern paper (Flurry). Crimp and accordion fold each piece. Use the Glue Gun to apply the hot glue around the snowman’s neck and place one strip around the front of the snowman’s neck. Repeat this to apply the other strip to the back of the neck, joining the edges at the side.
11. Twist a silver tinsel stem around the top of the accordion collar; add jingle bells to the ends and curl the wire using the end of a paintbrush handle. Add a dot of hot glue to the top of the sticker tag and tuck it under the collar.
13. Create a tiny cone from orange cardstock and use hot glue to affix to the snowman’s face. Paint the nose with a little glitter glue and let dry.
14. Apply snowflake stickers to the center of brown buttons and again use the hot glue to affix the buttons to the front. Apply glitter glue and gems.
15. Punch a small heart from the red Berries pattern paper, add a tiny dot of hot glue on the back and adhere to the snowman’s chest.
16. For the hat, create another accordion medallion (straight edge) from brown cardstock. Adhere a 1 ½” circle to the center to secure, then apply hot glue to the top side of the snowman’s head and press the medallion to affix the hat’s brim in place.
17. Punch/cut a 2” circle from brown cardstock. Cut a 2 ½” x 10” strip of brown cardstock. Apply a line of glue around the edge of the circle and position the cardstock strip around this to form a cylinder. Cut a 1” x 10” strip of Striped pattern paper, apply Perma Tac with the Glue Glider Pro and adhere this near the open end of the cylinder. Use the Glue Gun to apply hot glue to affix the cylinder on top of the accordion brim. Apply the winter sticker to the top of the hat and embellish with glitter glue and a gem.

19. Adhere 2 ribbon leaves to the brim of the hat with the Glue Gun as well as the small mushroom bird.
20. Apply Snow-tex on the floral pieces and on the snowman’s hat.
Don't you just love that??!!! Now onto some beautiful Girls' Paperie cards...

All Occasion Card Set
Designer: Kristen Swain
Supplies:
Papers/sticker - Girls Paperie
black houndstooth paper and glitter stickers- ( pink paislee)
Adhesive- Glue Arts Perma Tac and Glue Glider Pro- UCutIt foam- Glue Arts Adhesive Squares
accordion pleat stickers- American Crafts
black pen and paper piercer
letter stickers- american crafts
twine/buttons/mini clothes pins- craft supply
adhesive pearls- Kaisercraft
Imagine machine- scalloped circle cut
Embossing folder- Cuttlebug and Script folder
corrugated white paper - recycled from Pepperidge Farms cookie container
seam binding
glitter glue
Designer Tip- You can find items to use in your creating in unexpected places. I found a large piece and circle piece of white corrugated paper lining a tin of Pepperidge Farms cookies( Pirouette cookies) . The cookies were in their own packaging, and the tin was lined with this paper. I didn't even have to cut the circle shape, it was already precut!

Miss you card
1. Cut two papers into strips and add them vertically to card using Perma Tac adhesive. Cut off diecut edge of pink paper, then adhere scalloped part between two papers.
2. Paper pierce faux stitched lines, and then use pen to make fake thread lines.
3. Adhere corrugated circle piece to left edge, cutting off overlap.
4. Thread twine onto large button, tie bow and adhere with Adhesive Squares.
5. Adhere fabric stickers and accordion pleat stickers to card.

Love Potion No. 3 card
2. Add UcutIt foam to back of ruler sticker and adhere to top 1/3 of card.
3. Cut scallop circle with Cricut Imagine machine, then emboss with Cuttlebug and Script embossing folder, adhere over sticker, adding pieces of UCutIt foam to part of circle not under ruler sticker.
4. Adhere glitter stickers to circle.
5. Tie bows under buttons with twine, adhere to each end of ruler sticker.
6. Cut flower piece from patterned paper, carefully crumple piece, then adhere to card with Adhesive Squares, add glitter glue to leaf parts of paper piece.
7. Tie bow with seam binding and adhere pearl to center.

For you card
1. Cut diecut scallop from paper, adhere to bottom part of card, then add paper strips to card.
2. Cut another diecut edge from paper, add UCutIt foam to paper, then adhere across bottom of card as shown.
3. Tie bows with twine under buttons and adhere with Adhesive Squares to each end of diecut strip.
4. Cut square of paper, then add UCutIt foam to back, also adding small mini clothes pins to top ends of square.
5. Loop twine under one clothes pin and add pearl to pin as well.
6. Cut out floral piece from paper, crumple carefully and adhere to card with Adhesive Squares, then use glitter glue to add glitter to leaves.
7. Adhere letters to card.
Wow....talk about a truly inspiring post today! Don't you agree??
This last week with Echo Park Paper's Wintertime collection was such a fun week and so perfectly timed with all the snowfalls being reported! We do have one more winner to announce and that is:
That frame is absolutely darling and scrap-liftable. Beautiful projects all week. Such talent!
You have read this article 3D Combo Pac /
Extreme Adhesive /
Glue Gilder Pro /
Hot Glue Gun /
Kristen /
Patti
with the title Sweet Snowman Topiary. You can bookmark this page URL http://skinnyminny22.blogspot.com/2011/01/sweet-snowman-topiary.html. Thanks!


