

celebrating National Craft Month and bringing to you kids and yes...teen craft ideas. Spring break is popping up everywhere...so rather then here that..."I'm bored"...we've got just the idea that you can make together!
Today Designer Ania Lexander has a neat..yes...neat neat photo a day journal. This is just perfect for that teen who also has a cellphone with a camera! Have them snap shots each day of their break or just a week in their life and then help them put together this journal with our GlueArts Adhesives!
Andrea Budjack has a monstery fun wall hanging...frame these, make ones for a kids bathroom, room...and best yet...our adhesives are Kid Friendly too!

Photo-a-day-journal
GlueArts Designer: Ania Lexander
GlueArts Supplies:
Other: Various left over paper - mostly Pink Paislee, Hambly Screenprints, Elle's Studio vintage mix & match numbers, sewing machine,corner punch, Fiskars border punch, twine from the twinery, butterflychipboard from Sassafras, canvas butterfly from Maya Road, number stamps (used on the canvas butterfly) from Craft Origine, fabric brad from Crate Paper, gems from Prima
You know it's been popular w/these month long photo-a-day-challenges, issuing a challenge for you to take photo of every day for a month. Well, I figured I'd make a premade journalbook w/my own prompts for my young teenager niece who loves to take photos...

First - gather various scraps which'll match somewhat.
Doesn't matter that they won't be the same size - it's just cool.

Fold them together w/a bonefolder - you don't even need to make sure they are folded in the middle - one page can just as well be longer than the other. Use the border punch or the corner punch on some of the pages.

Carefully sew in the middle of the pages (or punch holes & thread some twine to hold the pages together).

I used Elle's Studio's Vintage Mix & Match numbers to add numbers to the pages. Some of the tags were fairly large, so I just added adhesive to the corner edges so that my niece will be able to lift the tags some to tuck her images in behind the number-tags. For some of the smaller number tags I just used the extreme adhesive squares - either large or small ones depending on the size of the tags.
.jpg)


As you can see I added transparencies to some of the pages - she can do whatever she'll like with them - add images or just leave them blank so they'll act like pretty empty pages in between.

Create-A-Monster Wall Hang
GlueArts Designer: Andrea Budjack
Supplies:
Glue Arts Fabric Bond *Our ExtremeTac is another option too!*
Glue Arts Glue Gun
Michaels - wooden frame
Really Reasonable Ribbon - ribbon
Papertrey Ink - buttons
Giant Dwarf - felt
burlap
batting
thread
needle
Instructions:
1. Cut burlap and batting to fit frame. (Note: Add threaded detail to burlap if desired prior to ironing.) Leave approximately 2" around of burlap to fold over frame.

2. Add Glue Arts Fabric Bond(ExtremeTac) to back side of frame, along edges. Fold burlap over frame and iron, leaving corners up.
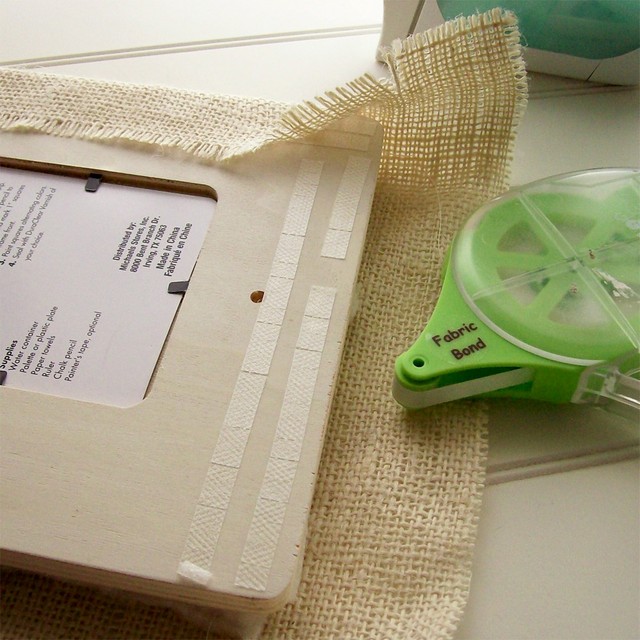
3. Add Fabric Bond(ExtremeTac) to corners and iron down.

4. Add Fabric Bond(ExtremeTac) to back of frame to add ribbon. Iron.

5. Cut felt to create your monster. Apply Fabric Bond(ExtremeTac) to front of burlap frame and iron.
(Note: Added detail to monster using hand stitching.)

6. Add buttons to monster using Glue Arts Glue Gun.
7. Add yellow ribbon to ends of white ribbon.
7. Add yellow ribbon to ends of white ribbon.


We'd like to help you make some "Kid Approved" crafts and give you a chance to win! Post a comment and let us know what your planning for your spring break or kids crafts! We'll enter you to win our Glue Glider PRO+, Adhesive Squares and our Raisen's! (and they're not the kind kids don't want to eat!lol)
They're the fun dimensional adhesive squares to give items a little lift!
Last week's winner is:
Love this tutorial. Thanks for sharing. Here is my pinterest http://pinterest.com/blw1003/glue-arts/
You have read this article Andrea /
Ania /
Glue Arts Glue Gun /
Glue Gilder Pro /
Pro+
with the title Create A Craft with GlueArts!. You can bookmark this page URL http://skinnyminny22.blogspot.com/2012/03/create-craft-with-gluearts.html. Thanks!


