
 |
| Source |
Will make the perfect witches stew!
This week we're a bit like a stew if you will....a bit of this and a bit of that!
Many of us Glue Girls found when we worked with Echo Park Paper's Happy Halloween collection, that we had a hard time just making one item. So we have some more bits and pieces to share!
Also another beautiful card set from Designer Patti Milazzo using the Hero Arts stamps and we have a fun promotion to announce too...just in time for Halloween!
All of these are on this week's agenda...so be sure you don't miss a post!


Eeek! Blocks
Designer: Julia Sandvoss
Supplies:
Echo Park Happy Halloween Papers & Sticker
Glue Arts Glue Glider Pro Perma Tac Adhesive
Glue Arts 3D Combo Foam Adhesive
Making Memories Slice & Spellbound Card
Colorbox Chalk Inks
Tattered Angels Graphite Spray
Pink Paislee Pixie Sticks Glitter
Stickles Copper
Wire
Wood Blocks from Hobby Lobby
1) Cut papers to fit wood blocks. Using Slice cut various shapes to fit onto blocks.
2) Ink or spray to embellish the diecuts. Adhere to blocks using Glue Glider Pro and 3D Combo Pac.
3) Spice up a letter by glittering with Pink Paislee Pixie Sticks.
4) Add a fun bat...attach wire on backside and tuck behind paper.


Boo Card
Designer: Leslie Ashe
Supplies:
Echo Park: Patterned Paper: Haunted House Happy Haunting, Sticker Sheet
Glue Arts 3D Adhesive Pack
Glue Glider Pro, High Tac adhesive
Ribbon Adhesive
Instructions:
1) Cut Echo Park's Happy Haunting Paper 6 x 12 inches, fold & score.
2) Use a border punch on the edge
3) Cut circle ( I used an old cd as my easy fast guide) from Echo Park's Haunted House (I used opposite side with polka dots)
4) Place circle to the right of card
5) Put witch boot stickers towards bottom of card
6) Put "BOO" sticker above, using 3D adhesive
7) Put "October 31st" sticker right above
8) Put "witch's hat" sticker to the right of that circle
9) Tie ribbon on left side of circle
10) Trace boots and hat with silver pen. (you can also put silver dots on polka dots in the paper)
with a black pen, stitch around circle
11) Add ink to edge of card if desired


Whoo Loves Halloween Layout
Designer: Lindsay Wahl
Supplies:
• Glue Arts Adhesive Squares, Glue Glider Pro Perma Tac, UCutIt Foam
• Echo Park Happy Halloween Collection
• American Crafts & DCWV cardstock
• EK Success Owl punch
• Cricut, Storybook & Paper Dolls Dress Up cartridges
• Quickutz, Instant Photo
• Bo Bunny buttons
• Zig 2-way glue pen
1. Die cut photo frames, 3 owls and title/tree.
2. Adhere border stickers to the bottom of the layout. Add “Halloween” title to layout. I used liquid adhesive on the smaller letters. Cut foam adhesive to raise the “H” from the page. Add spider sticker to the letter “H.”
3. Add “whoo loves” letter stickers to the page. Cut photos to fit the frames. Use the Pro to adhere photos and frames to the layout. Add sticker captions to photo frames.
4. Use foam adhesive to adhere the tree to the page. Use foam adhesive again to add the owls to the tree and the title.
5. Use star stickers and adhesive squares to add buttons to the bottom corner of the layout.
6. Add journaling and your layout is complete!
Last week we partnered up with Hero Arts. Designer Patti Milazzo has two cards that are absolutely beautiful! So we wanted to be sure you did get to see these...we're sure you'll agree...they are simply wonderful!
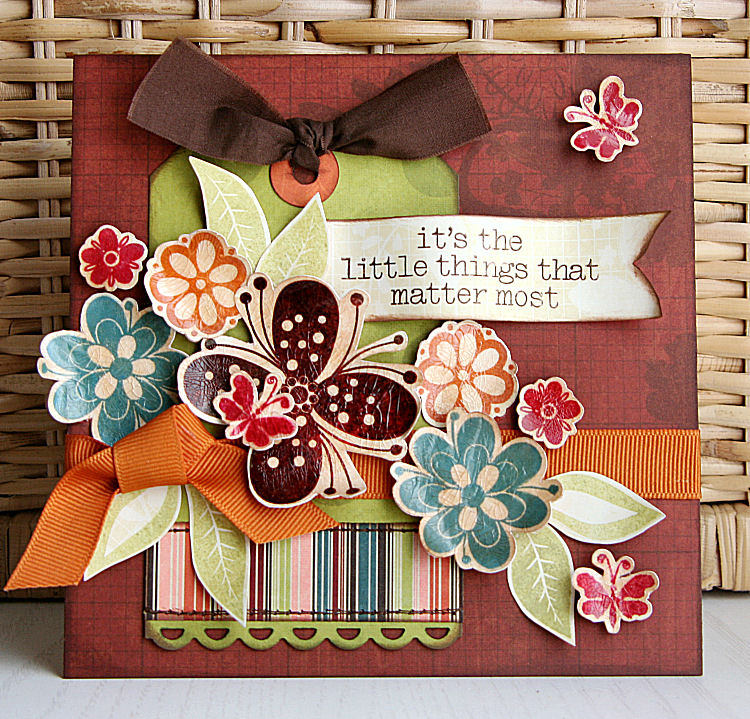

It's the Little Things Card
Designer: Patti Milazzo
Supply List-
Glue Arts:
Glue Glider Pro with
1/4 Perma Tac Cartridge Refill - Pro
Mini Adhesive Squares
Adhesive Squares
3D Combo Pac – U Cut It & Raise ‘Ns
Spooled Ribbon Adhesive
Hero Arts Stamps:
Bold Blossoms Stamps
Big Hugs Stamps
Instructions:
1. Cut 6” square piece of pattern paper to serve as card front.
2. Create 3” x 5” tag with scalloped bottom edge. Add a strip of pattern paper to the bottom of the tag and a hole at the top to tie a piece of coordinating fabric. Adhere tag to left side of card.
3. Tie coordinating 5/8” wide ribbon around card front and tag. Apply the Ribbon Adhesive to keep the ribbon in place.
4. Stamp flower designs from the Bold Blossoms stamp set and butterfly design from the Big Hugs stamp set on cream pattern paper or cardstock using coordinating ink colors.
5. Cut out flower and butterfly stamped images using a craft knife.
6. Coat each stamped cut out with a crackle medium and let dry thoroughly to get the cracked effect.
7. Once dry, light rub in a small amount of brown ink and wipe away any excess. This will show off the crackle effect.
8. Adhere flowers and butterflies across the tag and ribbon as shown using the Perma Tac and U Cut It Foam Adhesive.
9. Stamp leaves on cream pattern paper/cardstock using green ink, cut out, apply adhesive and tuck in between flowers.
10. Stamp the sentiment on cream pattern paper/cardstock, trim and cut the tale and like a banner. Apply Perma Tac adhesive to the back and tuck in behind the leaves.


Miss You Card
Designer: Patti Miliazzo
Supplies:
Glue Arts:
Glue Glider Pro with
1/4 Perma Tac Cartridge Refill - Pro
3D Combo Pac – U Cut It & Raise ‘Ns
Extreme Micro Squares
Spooled Ribbon Adhesive
Hero Arts Stamps:
Delicate Blossoms Stamps
Big Hugs Stamps
Instructions:
1. Create a 5” x 7” card with a ribbon tied around the lower middle of the card. Apply the Ribbon Adhesive to keep the ribbon in place.
2. Cut a 3” x 6” piece of pattern paper and adhere to the left side of the card and to the left of the ribbon knot.
3. On cream pattern paper/cardstock, stamp the Big Hugs butterfly image using a slightly darker ink color to create the butterfly pattern on the tag.
4. Stamp the sentiment in the center of the tag. Attach a brad and using the Extreme Micro Squares adhere the tag to the knot of the ribbon.
5. Stamp the Delicate Blossoms image on cream pattern paper and trim to 2.5” x 5.5”. Color the stems with a brown color pencil.
6. Stamp the Delicate Blossoms image twice on peach pattern paper. Cut out one set of the flower blossoms and adhere to stamped cream pattern paper.
7. With the second set, cut out only the inside section of the two larger flowers and adhere those with the U Cut It Adhesive Foam.
8. Apply the U Cut It Adhesive Foam to the back of the cream pattern paper and adhere it on the dark pattern paper rectangle.

It's time for us to announce the winner of the Holiday Stamp Set, Glue Arts Ribbon Adhesive, our 3D Combo Pack (perfect for cardmaking!) and our Adhesive Squares! The winner is:
Wow!!! So many ideas!!! The poppy stamp is gorgeous and I REALLY like the green mist spray!! I think I am going to have to go find me some of that!!!
You have read this article 3D Combo Pac /
Glue Gilder Pro /
Julia /
Leslie /
Lindsay /
Patti /
Perma Tac
with the title A Bit of This.... You can bookmark this page URL http://skinnyminny22.blogspot.com/2010/10/a-bit-of-this.html. Thanks!


