
 |
| Source |
Needles
Thread
Adhesive {GlueArts of course!}
Photos....
These are the items that keep us together...hold us to our family and lives.
"This I know: the act of getting my hands, heart and soul into making & inventing something brings great pleasure. Where there was once a neatly folded flat piece of cloth, suddenly there is a dimensional garment. In spite of setbacks (buttonholes gone bad, unintended puckers, 2 left sleeves.......), I return to the studio with passion and hope. Some days the act of stitching something together, smoothing out wrinkles, shaping an edge, tweaking a pattern, screening in a bit of color, all add together to make a feeling of joy that is almost beyond words. " Marcy Tilton
Today's projects are made of fabric, photos, thread, adhesive and both are beautiful ways to show your love. Whether you make it and keep it for yourself {yes that's allowed} or share with someone special!! Designers Ania Lexander and Grace Tolman capture joy beyond words...


A Mantelpiece-booklet
Designer: Anne Jo Lexander
This is an extra sturdy "card" which can be placed upon your bookshelf, or mantelpiece, as it can be displayed opened to show the images inside this booklet.
Size: 5x5,5"
GlueArts Supplies:
GlueGlider Pro - extreme cartdridge, Mini Adhesive Squares, Extreme Adhesive Squares, U Cut It 3d foam adhesive, 3d Raisen's
Other: Cardboard, patterned paper (Pink Paislee - 365 degrees), Martha Stewart Double Loops Punch set and butterfly punch, Maya Road tags, ribbon and fabric flowers, chalk glimmer mist, Fancy Pants Designs rub-ons, heartshaped doily, eyelets, patterned scissors, corner rounder, crop-a-dile


I decided my inner pages would be quite simple-looking - one background, images + tags with the kids names on.

I used my crop-a-dile to punch holes on each side like this.

As for the cover, I wanted the tag to stand out some, but not too much. The 3d Raisen's were perfect for my purpose - a bit dimensionable but not as thick as the 3d U-cut-its.


And the tag for the back-cover was attached using 3d u-cut-its.


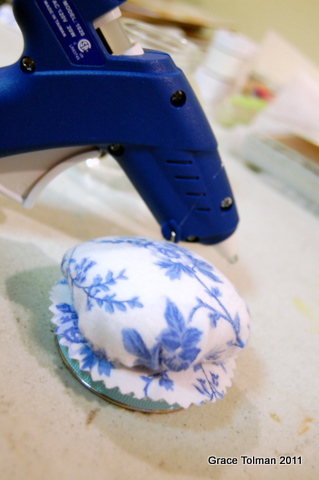
Notions Sewing Jar
Designer: Grace Tolman
Supplies:
Glue Arts Glue gun
Glue Arts High tac
Glue Arts Extreme Squares
Ribbon- American Crafts
Pattern papers- Green Stack, Die Cuts with a View
Letter stickers- KI Memories
Cardstock- Bazzill
Heart die cut- Cricut, Provo Craft
Fabrics- Source unknown
Sewing notions- Singer
Others- fiber filling, Jar and Cardboard
Instructions:
1. Gather your supplies.


5. Cut out another piece from fabric that is ½” bigger than the lid. Use pinking shears to cut out the shape to give it a design and also, the zigzag edges will keep it from fraying too much. Adhere onto the top of the lid with a glue gun.


11. Add some letter stickers.

13. Then add your goodies inside the jar and placed pins on the pin cushion.
We'd like to help you with a little joy! Simply leave us a comment today! We'll select a random winner next Monday who will send a box full of joy too!

In honor of celebrating Mom's and National Scrapbook Day this weekend...we'd like to offer to you a special giveaway this week.... a Glue Glider Pro, refill of YOUR choice, our Extreme Adhesive Squares and our GlueArts Hot Glue Gun. Plus as an added bonus...we're including the brand new, Cricut Wall Decor and More Cartridge!

Compatible for all Cricut Expression and Imagine die cut machines! Simply leave us a comment today and we'll select a random winner next Monday!

Please be sure you're following our blog and our Fan on Facebook and Twitter. We have some specials and fun planned for this weekend to celebrate National Scrapbook Day and Mother's Day! We just know you will NOT want to miss out!
And just a note we'll be announcing the winner of our Poetry contest this Saturday...National Scrapbook Day!
You have read this article 3D Combo Pac /
Ania /
Extreme Adhesive Squares /
Glue Arts Glue Gun /
Grace /
Raisen's /
U Cut It Foam
with the title Joy Beyond Words..... You can bookmark this page URL http://skinnyminny22.blogspot.com/2011/05/joy-beyond-words.html. Thanks!


