

Come on shake it up!
How many of you have ever made a shaker card or shaker element?
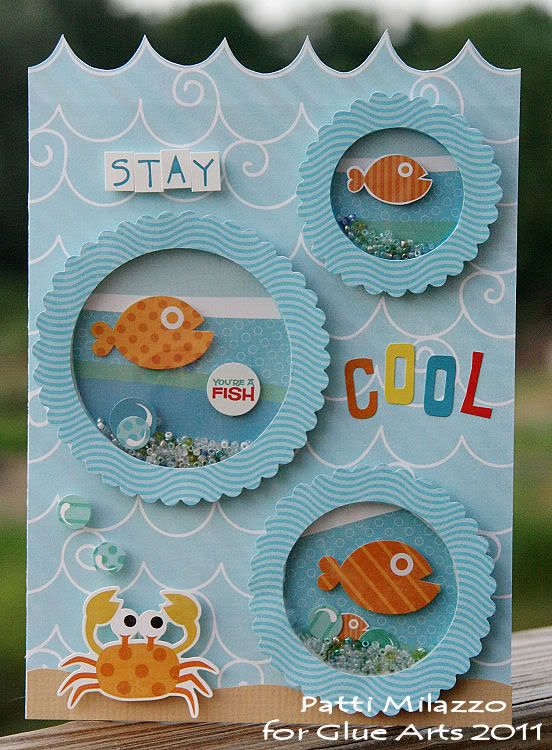
Designer Patti Milazzo has brought shakers back to the spotlight with her fun, fishy shaker card. GlueArts U Cut It Foam makes it a snap to create this dimensional card. Create a larger shaker with our 8 1/2 by 11 U Cut It Foam sheet for a fun room decoration, school lockers...the possibilities are endless!

Supplies:
Glue Arts:
U-Cut-It Adhesive Foam (large sheet)
Glue Glider Pro with 1/4 Perma Tac Cartridge Refill - Pro
Mini Adhesive Squares
Adhesive Squares
Other:
Echo Park:
Splash Pattern Papers – Big Waves, Borders (fish), Whales, Fish, and Diagonal Stripes
Splash Element Stickers
Splash Alpha Stickers
Instructions:
1. To create the circle shakers as I have here, start by cutting rings out of a large sheet of Glue Arts U-Cut-It Adhesive Foam. You can use a die cutting machine or other tools to do this. I used a circle template and circle cutting tool along with a craft knife to cut through the foam. The foam is VERY easy to cut through. I cut 3 rings – 1.5” opening, 2” opening and 2.5” opening.
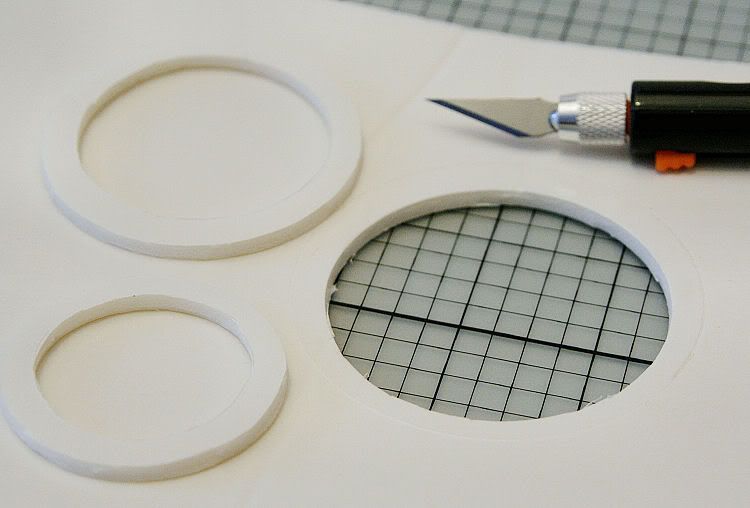
Tip: To decrease waste, but the circles concentrically if possible. I started with my smallest ring and cut the opening first. Then I cut around that to complete the ring. I continued in the fashion until I had 3 rings that I’d already determined would fit on my 5.5” x 7.5” card.
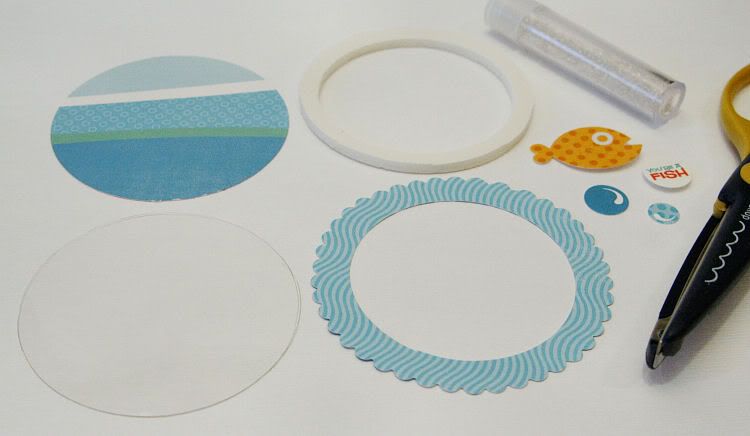
2. Next, cut and prepare what you’ll need to make each individual shaker. I wanted my shakers to be a bit sturdier and with a different background pattern paper so I made them each separately rather than attaching them directly to the card. For this, you need 4 pieces – the foam ring; a background circle the same diameter as the ring; a clear acetate circle also the same diameter as the foam ring; and a pattern paper ring that has the same opening diameter as the foam ring. For this outer paper ring, I cut it a bit larger and trimmed it with scallop edge scissors. The larger size allowed for a little overlap to cover up the foam a bit.
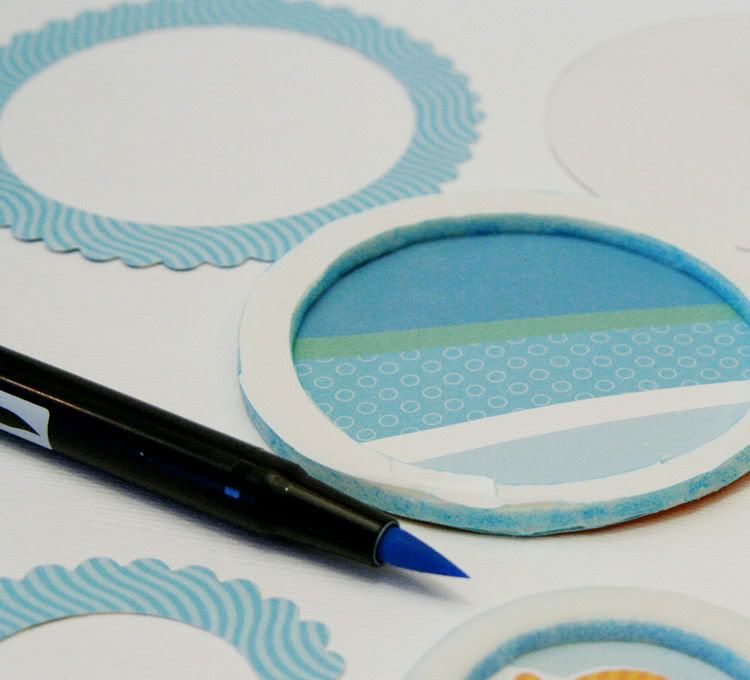
3. I used a blue marker to lightly color the inner and outer sides of the foam ring. This helped blend the foam with pattern paper.
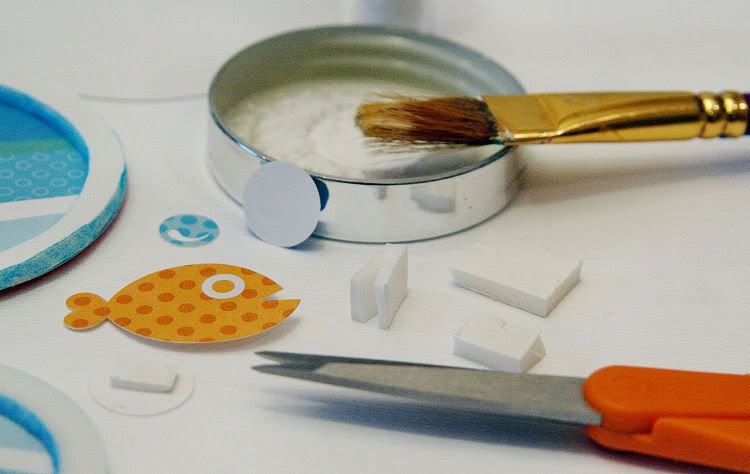
4. Prepare the pieces to be placed inside each shaker. I used a combination of stickers and cut out paper shapes for accents. For some of these pieces, I cut the U-Cut-It Adhesive Foam in half so that these pieces would not sit as high inside the shaker. I attached this cut foam to the back of a fish sticker shape with a Mini Adhesive Square on the cut side. I left on the peel away backing and brushed a bit of baby powder onto the back of the sticker to remove the stickiness – this keeps other items inside the shaker from sticking to it.
5. Partially assemble the shaker. Remove the peel away backing from one side of the foam ring. Attach the background circle to the ring and press firmly. Apply the foam backed stickers/paper shapes inside the shaker and press to secure. Brush the inside of the shaker with a bit of baby powder to remove any stickiness inside the shaker. Also, gently rub a dryer sheet over the inside surface a bit. This will cut down on any static inside the shaker. Now add any loose items inside the shaker – more stickers (powder the back), small seed beads, etc.
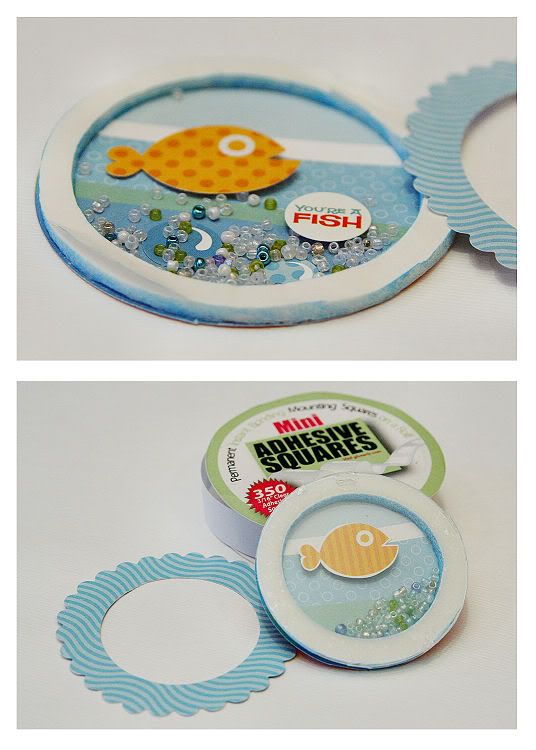
6. Next, carefully peel away the paper backing on the top of the ring and apply the acetate circle to seal the shaker. Use Mini Adhesive Squares around the edge of the acetate to attach the paper scalloped circle ring. Repeat this to create each circle shaker accent.
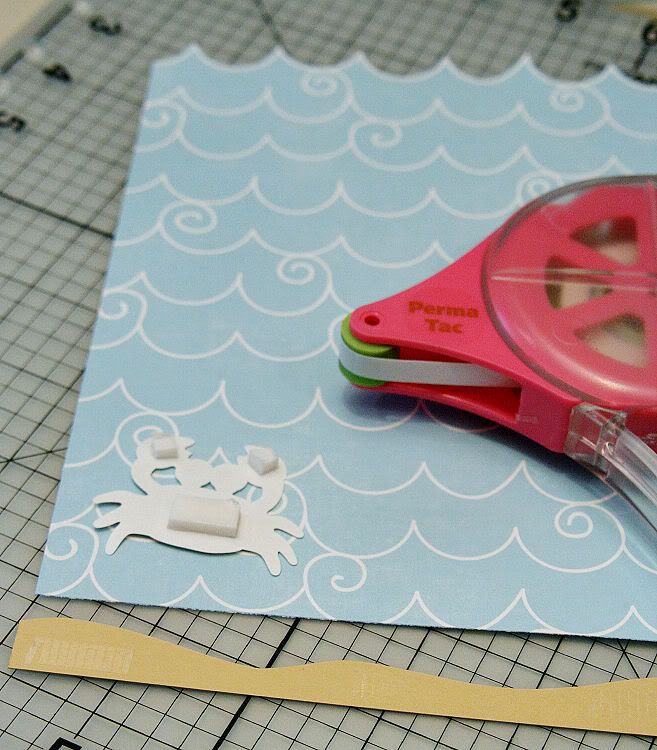
7. For the card, create a 5.5” x 7.5” card from white cardstock. Then cut the wave pattern paper a bit taller than the card, cutting out the wave shape at the top if possible. Adhere this to the card with the Glue Glider Pro with Perma Tac Adhesive. Cut a curvy strip of tan paper for the sand at the bottom and adhere that to the card again using the Perma Tac Adhesive. Add some U-Cut-It Adhesive Foam to the back of the cute little crab sticker and attach him to the bottom left of the card along with a couple of foam backed bubble stickers.
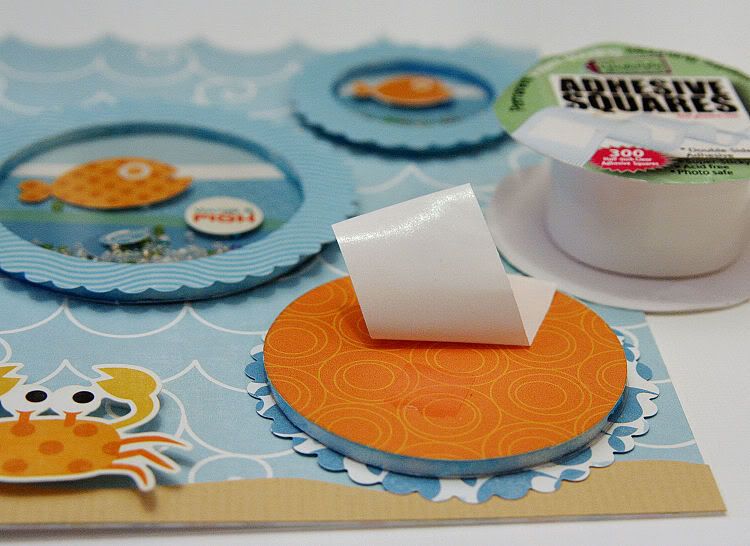
8. Use Adhesive Squares on the back of each circle shaker accent to secure them to the front of the card, as shown.
9. Pop up alpha stickers with a small strip of U-Cut-It Adhesive Foam (or directly to the card front) for the greeting to complete the card.
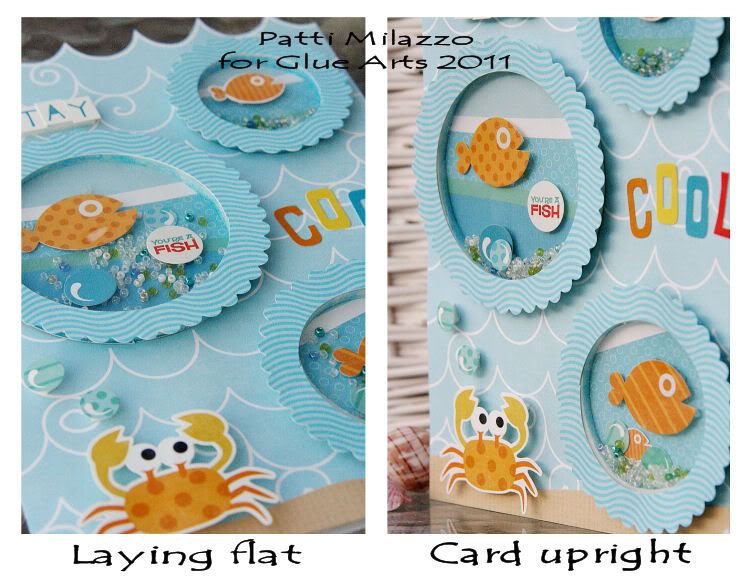
10. Now give it a shake!
Glue Arts:
U-Cut-It Adhesive Foam (large sheet)
Glue Glider Pro with 1/4 Perma Tac Cartridge Refill - Pro
Mini Adhesive Squares
Adhesive Squares
Other:
Echo Park:
Splash Pattern Papers – Big Waves, Borders (fish), Whales, Fish, and Diagonal Stripes
Splash Element Stickers
Splash Alpha Stickers
Instructions:
1. To create the circle shakers as I have here, start by cutting rings out of a large sheet of Glue Arts U-Cut-It Adhesive Foam. You can use a die cutting machine or other tools to do this. I used a circle template and circle cutting tool along with a craft knife to cut through the foam. The foam is VERY easy to cut through. I cut 3 rings – 1.5” opening, 2” opening and 2.5” opening.
Tip: To decrease waste, but the circles concentrically if possible. I started with my smallest ring and cut the opening first. Then I cut around that to complete the ring. I continued in the fashion until I had 3 rings that I’d already determined would fit on my 5.5” x 7.5” card.
2. Next, cut and prepare what you’ll need to make each individual shaker. I wanted my shakers to be a bit sturdier and with a different background pattern paper so I made them each separately rather than attaching them directly to the card. For this, you need 4 pieces – the foam ring; a background circle the same diameter as the ring; a clear acetate circle also the same diameter as the foam ring; and a pattern paper ring that has the same opening diameter as the foam ring. For this outer paper ring, I cut it a bit larger and trimmed it with scallop edge scissors. The larger size allowed for a little overlap to cover up the foam a bit.
3. I used a blue marker to lightly color the inner and outer sides of the foam ring. This helped blend the foam with pattern paper.
4. Prepare the pieces to be placed inside each shaker. I used a combination of stickers and cut out paper shapes for accents. For some of these pieces, I cut the U-Cut-It Adhesive Foam in half so that these pieces would not sit as high inside the shaker. I attached this cut foam to the back of a fish sticker shape with a Mini Adhesive Square on the cut side. I left on the peel away backing and brushed a bit of baby powder onto the back of the sticker to remove the stickiness – this keeps other items inside the shaker from sticking to it.
5. Partially assemble the shaker. Remove the peel away backing from one side of the foam ring. Attach the background circle to the ring and press firmly. Apply the foam backed stickers/paper shapes inside the shaker and press to secure. Brush the inside of the shaker with a bit of baby powder to remove any stickiness inside the shaker. Also, gently rub a dryer sheet over the inside surface a bit. This will cut down on any static inside the shaker. Now add any loose items inside the shaker – more stickers (powder the back), small seed beads, etc.
6. Next, carefully peel away the paper backing on the top of the ring and apply the acetate circle to seal the shaker. Use Mini Adhesive Squares around the edge of the acetate to attach the paper scalloped circle ring. Repeat this to create each circle shaker accent.
7. For the card, create a 5.5” x 7.5” card from white cardstock. Then cut the wave pattern paper a bit taller than the card, cutting out the wave shape at the top if possible. Adhere this to the card with the Glue Glider Pro with Perma Tac Adhesive. Cut a curvy strip of tan paper for the sand at the bottom and adhere that to the card again using the Perma Tac Adhesive. Add some U-Cut-It Adhesive Foam to the back of the cute little crab sticker and attach him to the bottom left of the card along with a couple of foam backed bubble stickers.
8. Use Adhesive Squares on the back of each circle shaker accent to secure them to the front of the card, as shown.
9. Pop up alpha stickers with a small strip of U-Cut-It Adhesive Foam (or directly to the card front) for the greeting to complete the card.
10. Now give it a shake!
We invite you to post a comment today! Let us know have you made any shaker cards or elements? How will you use our U Cut It Foam?

We'll enter you to win our 3D Combo Pack filled with our 4 by 4 sheets of our U Cut It Foam along with our Raisen's (that we know you'll love too!) plus we'll include our full 8 1/2 by 11 sheet of our U Cut It Foam...

perfect for running through your Sizzix, Spellbinders, Cuttlebug and other die cut systems. And last we would like you to try out our Extreme Adhesive Squares. We'll pick a random winner next Monday to enjoy the goodies!
Thanks for stopping by the GlueArts blog!
You have read this article Adhesive Squares /
Mini Adhesive Squares /
U Cut It Foam
with the title GlueArts U Cut It Foam Shakes It Up!. You can bookmark this page URL http://skinnyminny22.blogspot.com/2011/08/gluearts-u-cut-it-foam-shakes-it-up.html. Thanks!


