

Sunshine, Splash, Summer,
Snowcones, Swimming, Shore.....
Sunsets and more!
We're wrapping up our week long feature of Echo Park Paper's Splash Collection and we're going out with a Cannonball!!!!!!!!!
Designer Patti Milazzo has pulled out all the stops today with her project! It's so amazing...we're truly at a loss for words and bet you'll agree! She was inspired by various crayon art she's seen....we think hers is tops!!
And we're back with our final project from our Guest Glue Girl...Mandy Starner! Love her layout and how she used a beach collection to create a bright, colorful layout that works without the sand!lol
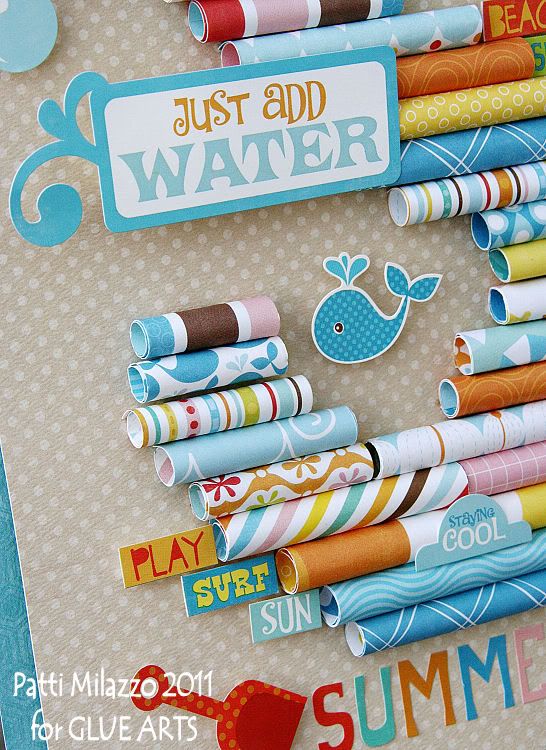
Summer Monogram Sign
GlueArts Designer: Patti Milazzo
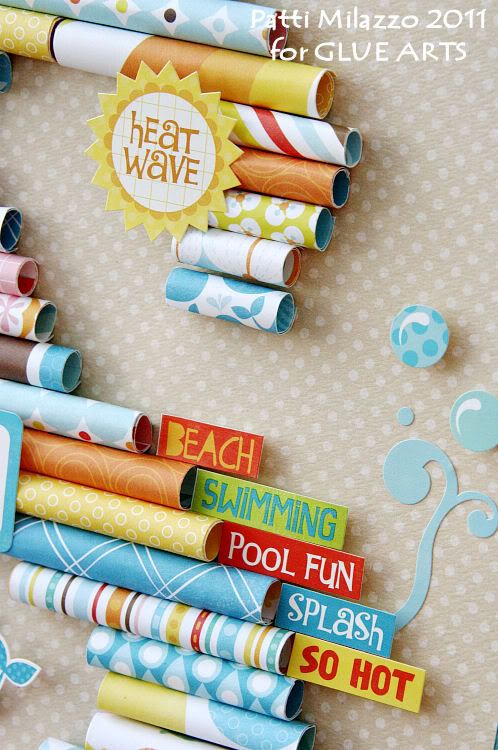
Pin ItDesigner Tip: I was inspired by the fun monogram crayon projects that I’ve seen all over the web. In place of crayons, I rolled small pieces of pattern paper and created my own summer themed monogram décor sign for our end of summer celebrations.
Supplies:
Glue Arts:
Glue Glider Pro with
1/4 Perma Tac Cartridge Refill - Pro
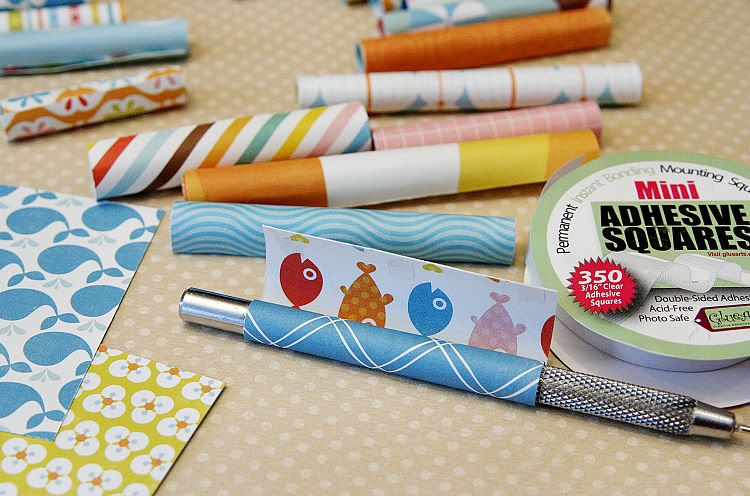
Mini Adhesive Squares
U-Cut-It Adhesive Foam
Extreme Micro Squares
Echo Park Paper:
Splash Pattern Paper – Diagonal Stripes, Die Cut, Big Waves, Journaling, Whales, Borders, Sunshine, Big Dots, Fish, Mini Stripes, Umbrellas and Big Stripes
Splash Alpha Stickers
Splash Element Stickers
Other: Coordinated cardstock for background
Instructions:
1. Determine what letter you want to use as a monogram and the size of your background paper. Cut many small pieces of pattern paper varying in length and about 2.5” wide giving you plenty of room for overlapping when you roll them.
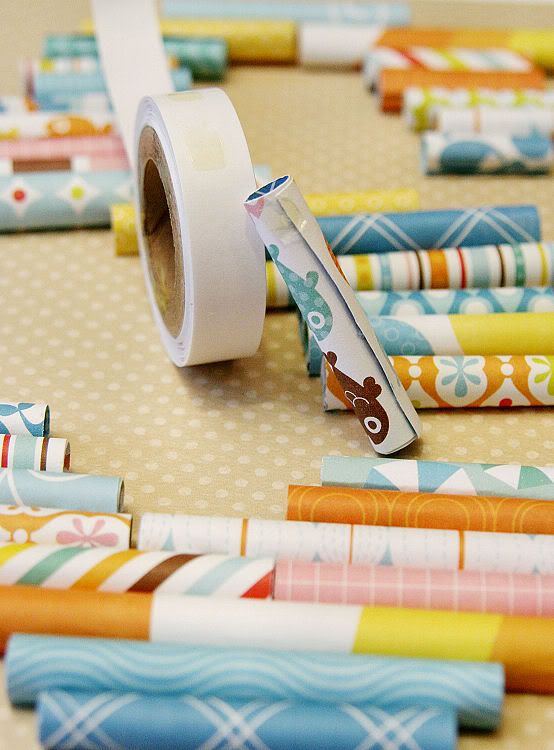
2. Use a pencil, dowel or other tool to roll your paper pieces around. Secure the paper with a few Mini Adhesive Squares to prevent them from unraveling. Once you have several done, start organizing them loosely on your background to determine where you want to ultimately place each roll. It takes a little time and patience to find the right shape but it comes together quickly once you have most of your rolled pieces prepared.
3. When you have the design set start with the roll at the bottom of your letter and plan to work your way up. Apply a few Extreme Micro Squares where the paper edge is on each roll. Press the roll onto the background. This will further secure the roll from unraveling and adhere it to the background. Now work your way up the letter with each roll. Take your time, it may need some tweaking along the way!
3. When you have the design set start with the roll at the bottom of your letter and plan to work your way up. Apply a few Extreme Micro Squares where the paper edge is on each roll. Press the roll onto the background. This will further secure the roll from unraveling and adhere it to the background. Now work your way up the letter with each roll. Take your time, it may need some tweaking along the way!

4. Once the monogram letter is complete, embellish on and around it with sticker accents. On the “Just Add Water” sticker, I stacked 3 pieces of U-Cut-It Adhesive Foam together to equal the height of the rolled paper. This added extra support to the side that isn’t adhered to the rolled paper.
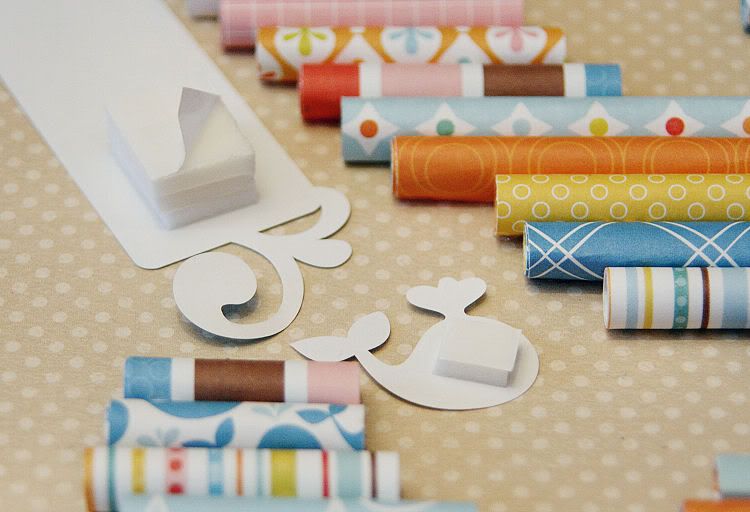
5. Use additional U-Cut-It Adhesive Foam on the back of word stickers and bubbles for added dimension to complete your project. Enjoy!
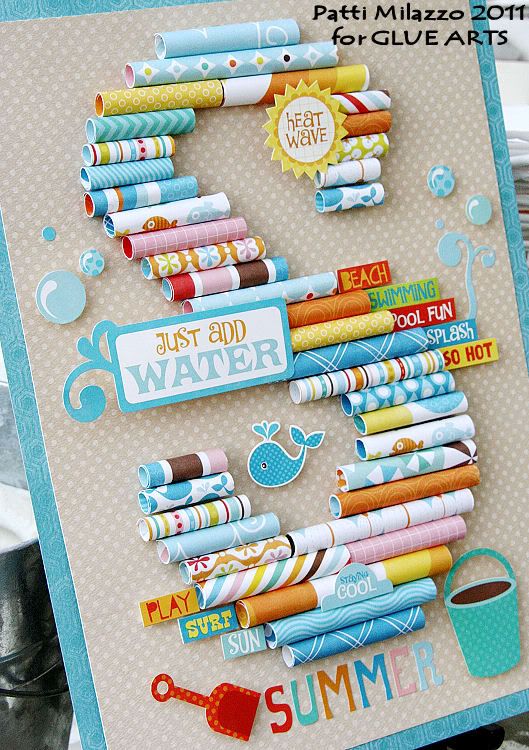
Designer Suggestion: Pick any theme for this project – a birthday sign, holiday theme or a child’s initial as décor for their room.

Today is our final project from our amazing Guest Designer Mandy Starner!
We hope you've stopped by and visited Mandy's blog for more inspiration and ideas!!!
A very big thanks to Mandy for accepting our invitation and creating such great projects for us to share all week long!!


Instragr.am Love Layout
GlueArts Guest Designer: Mandy Starner
Supplies:GlueArts Accent It All Vinyl - White Out
GlueArts Extreme Tac Mini Adhesive Squares
GlueArts Raisen's
GlueArts U Cut It Foam
GlueArts Glue Glider Pro - Perma Tac
Echo Park Paper Splash Collection
Instructions:
1. Cut title from Accent It All vinyl(white) using a die cut machine and adhere to layout.

2. Spray background cardstock with spray ink.
3. Use Extreme Tac minis to attach strips and punched borders to layout, just below title.


4. Cut out camera and polaroid images from patterned paper. Cut a slit in the camera image so that you can slide one of the polaroids in.

5. Adhere camera to layout on the left side of the strips using Raise n's.


6. Adhere extra polaroids to the left of the camera using the Glue Glider Pro and Perma Tac.

7. Cut and adhere U Cut It foam where you want your photos to be, then line up and adhere your photos on top.

8. Add some confetti and a punched heart or two using Extreme Tac minis.

9. Finish off the layout with some journaling or the date, using your Glue Glider Pro with Perma Tac to adhere.

So that's our week!
We hope we've inspired you all week long with mini books, shadow boxes, layouts to help capture those special memories, sunshiney cards and today's monogram sign!
We'd like for you to have a chance to win the Echo Park Paper Splash collection. Simply post a comment today and we'll enter you to win not just the Splash Collection but our Glue Glider Pro, Extreme Adhesive Squares AND our 3D Combo Pac!

We'll select one random winner on Monday. And remember....you cannot win unless you post a comment!! It's just that simple!
You have read this article Echo Park Paper /
Guest Designer /
Patti
with the title S is for Summer with Echo Park & GlueArts. You can bookmark this page URL http://skinnyminny22.blogspot.com/2011/08/s-is-for-summer-with-echo-park-gluearts.html. Thanks!


